M365 Exchange Online 메세지 수발신 크기 늘리기
Microsoft 365 Exchange Online의 기본 메일 수발신 크기는 20MB로 고정되어 있다.
그래서 첨부파일이 20MB 이상이 되면 발신이 안되거나, 첨부파일이 20MB 이상 탑재된 메일이 수신되면 차단이 된다.
이를 위해서 조정이 필요하다.
아래는 본인이 지원받은 Microsoft Customer Support의 전언이다.
| 1)admin.exchange.microsoft.com 관리자 계정으로 위 URL 접근 > 받는사람 >사서함>메일 흐름 설정 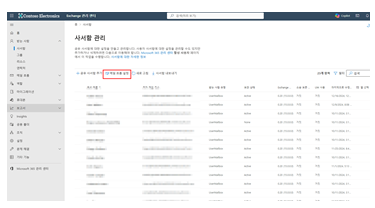 2.메시지 크기 제한 클릭 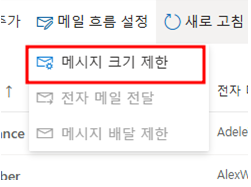 3.보낸 메시지,수신 메시지 크기를 희망하시는 사이즈로 변경 해주세요. 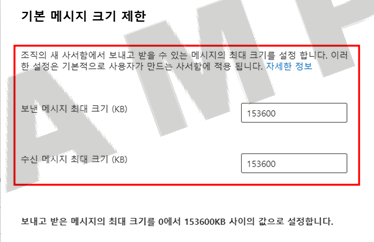 |
그러나, 이렇게 설정하면 기본 설정은 되지만 이미 생성된 계정 및 사서함에는 적용되지 않는다.
그래서 추가 질문에 답변된 사항은
| 이전 메일에서 안내 드린 설정 방법은 전체 사서함 설정은 맞으나 설정 이후 부터 생성된 전체 사서함에만 적용되는 부분 확인했습니다. 기존 사서함 같은 경우에는 각 사서함별로 클릭해서 변경하거나 Powershell로 전체 적용 해야 합니다. 아래는 파워쉘 진행 방법입니다. Windows 하단 검색란에 Powershell 프로그램 검색 후 우클릭 하여 관리자권한으로 실행해주세요 1.Set-ExecutionPolicy -ExecutionPolicy bypass process 2.Install-module exchangeonlinemanagement -force 3.Connect-ExchangeOnline 4.get-mailbox | set-mailbox -MaxSendSize 100mb -MaxReceiveSize 100mb MaxSendSize =발신 메시지 크기 설정 MaxReceiveSize =수신 메시지 크기 설정 *위 명령어 하나씩 복사 붙여넣기 해주세요 *MaxSendSize,MaxReceiveSize는 희망하는 사이즈로 변경 후 복붙 해주세요 *설정가능 Maximum size는 135mb입니다. *로그인창 발생하면 고객님의 관리자 계정으로 로그인 부탁드립니다. |
Windows PowerShell
Copyright (C) Microsoft Corporation. All rights reserved.

새로운 기능 및 개선 사항에 대 한 최신 PowerShell을 설치 하세요! https://aka.ms/PSWindows
PS C:\Users\DS1NMA> Set-ExecutionPolicy -ExecutionPolicy bypass process
PS C:\Users\DS1NMA> Install-module exchangeonlinemanagement -force
계속하려면 NuGet 공급자가 필요합니다.
NuGet 기반 리포지토리를 조작하려면 PowerShellGet에 NuGet 공급자 버전 '2.8.5.201' 이상이 필요합니다. 'C:\Program
Files\PackageManagement\ProviderAssemblies' 또는
'C:\Users\DS1NMA\AppData\Local\PackageManagement\ProviderAssemblies'에서 NuGet 공급자를 사용할 수 있어야 합니다. 또한
'Install-PackageProvider -Name NuGet -MinimumVersion 2.8.5.201 -Force'를 실행하여 NuGet 공급자를 설치할 수 있습니다.
지금 PowerShellGet에서 NuGet 공급자를 설치하고 가져오시겠습니까?
[Y] 예(Y)  [N] 아니요(N)  [S] 일시 중단(S)  [?] 도움말 (기본값은 "Y"): y
PS C:\Users\DS1NMA> Connect-ExchangeOnline

----------------------------------------------------------------------------------------
This V3 EXO PowerShell module contains new REST API backed Exchange Online cmdlets which doesn't require WinRM for Client-Server communication. You can now run these cmdlets after turning off WinRM Basic Auth in your client machine thus making it more secure.

Unlike the EXO* prefixed cmdlets, the cmdlets in this module support full functional parity with the RPS (V1) cmdlets.

V3 cmdlets in the downloaded module are resilient to transient failures, handling retries and throttling errors inherently.

REST backed EOP and SCC cmdlets are also available in the V3 module. Similar to EXO, the cmdlets can be run without WinRM basic auth enabled.

For more information check https://aka.ms/exov3-module
----------------------------------------------------------------------------------------

PS C:\Users\DS1NMA> get-mailbox | set-mailbox -MaxSendSize 120mb -MaxReceiveSize 120mb
이렇게 하니, 메세지 크기 제한이 늘어났다.

vCenter 및 ADFS 연동 후, MFA 적용시 403에러 발생
● ADFS 구축
- 단계 1. ADFS 서버를 구성한다.
- 단계 2. VMWare vCenter의 ID공급자를 구성된 ADFS로 설정하고 성공한다.
- 단계 3. https://learn.microsoft.com/ko-kr/windows-server/identity/ad-fs/operations/configure-ad-fs-and-azure-mfa 링크에 설명된 내용에 따라 ADFS에 MFA 구성을 실시한다.
AD FS 및 Microsoft Entra 다단계 인증 구성
AD FS를 사용하여 Microsoft Entra 다단계 인증을 인증 공급자로 구성하는 방법에 대해 자세히 알아보세요.
learn.microsoft.com
- 단계 4. VMWare vCenter에 로그인 페이지에서 ID를 입력한다.
- 단계 5. ADFS 로그인 페이지로 리다이렉션 된다.
- 단계 6. ADFS 로그인 페이지에서 ID를 입력하고, MFA 인증코드를 호출하게 되면,
- 단계 7. 403 에러가 표시된다. (Exception calling SAS)
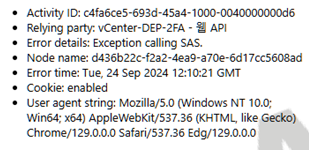
| (클라이언트 표시) Activity ID: c4fa6ce5-693d-45a4-1000-0040000000d6 Relying party: vCenter-DEP-2FA - 웹 API Error details: Exception calling SAS. Node name: d436b22c-f2a2-4ea9-a70e-6d17cc5608ad Error time: Tue, 24 Sep 2024 12:10:21 GMT Cookie: enabled User agent string: Mozilla/5.0 (Windows NT 10.0; Win64; x64) AppleWebKit/537.36 (KHTML, like Gecko) Chrome/129.0.0.0 Safari/537.36 Edg/129.0.0.0 (서버 이벤트로그 표시) 페더레이션 수동 요청 중에 오류가 발생했습니다. 추가 데이터 프로토콜 이름: OAuthAuthorizationProtocol 신뢰 당사자: 0d81cad4-5275-45aa-9f68-2146d619488d 예외 세부 정보: System.Exception: Exception calling SAS. ---> System.Net.WebException: 원격 서버에서 (403) 사용할 수 없음 오류를 반환했습니다. 위치: System.Net.HttpWebRequest.GetResponse() 위치: Microsoft.IdentityServer.Aad.Sas.HttpClientHelper.PostXml[TRequest,TResponse](String url, String authenticationMethod, TRequest request, Action`2 httpRequestModifier) 위치: Microsoft.IdentityServer.Aad.Sas.RealSasProvider.GetAvailableAuthenticationMethods(GetAvailableAuthenticationMethodsRequest request) 위치: Microsoft.IdentityServer.Adapter.AzureMfa.PrimaryAuthenticationAdapter.ProcessUsernameOathCodePin(IAuthenticationContext authContext, IProofData proofData, Claim[]& outgoingClaims) --- 내부 예외 스택 추적의 끝 --- 위치: Microsoft.IdentityServer.Adapter.AzureMfa.PrimaryAuthenticationAdapter.ProcessUsernameOathCodePin(IAuthenticationContext authContext, IProofData proofData, Claim[]& outgoingClaims) 위치: Microsoft.IdentityServer.Adapter.AzureMfa.PrimaryAuthenticationAdapter.TryEndAuthentication(IAuthenticationContext authContext, IProofData proofData, HttpListenerRequest request, Claim[]& outgoingClaims) 위치: Microsoft.IdentityServer.Web.Authentication.External.ExternalAuthenticationHandlerBase.TryEndAuthentication(IAuthenticationContext authContext, IProofData proofData, HttpListenerRequest request, Claim[]& adapterClaims) 위치: Microsoft.IdentityServer.Web.Authentication.Azure.AzurePrimaryAuthenticationHandler.Process(ProtocolContext context) 위치: Microsoft.IdentityServer.Web.Authentication.AuthenticationOptionsHandler.Process(ProtocolContext context) 위치: Microsoft.IdentityServer.Web.PassiveProtocolListener.OnGetContext(WrappedHttpListenerContext context) System.Net.WebException: 원격 서버에서 (403) 사용할 수 없음 오류를 반환했습니다. 위치: System.Net.HttpWebRequest.GetResponse() 위치: Microsoft.IdentityServer.Aad.Sas.HttpClientHelper.PostXml[TRequest,TResponse](String url, String authenticationMethod, TRequest request, Action`2 httpRequestModifier) 위치: Microsoft.IdentityServer.Aad.Sas.RealSasProvider.GetAvailableAuthenticationMethods(GetAvailableAuthenticationMethodsRequest request) 위치: Microsoft.IdentityServer.Adapter.AzureMfa.PrimaryAuthenticationAdapter.ProcessUsernameOathCodePin(IAuthenticationContext authContext, IProofData proofData, Claim[]& outgoingClaims) |
원인 : Microsoft 제공 가이드에 보면, 레지스트리에 SasUrl, StsUrl, ResourceUri 를 특정한 값으로 입력하라고 언급하였으나, 해당 값으로 적용시 동작하지 않음.
MS가 하란대로 하면 절대 안된다!!!
해결방법 : 레지스트리 값 변경
컴퓨터\HKEY_LOCAL_MACHINE\SOFTWARE\Microsoft\ADFS
SasUrl : https://adnotifications.windowsazure.com/StrongAuthenticationService.svc/Connector
StsUrl : https://login.microsoftonline.com
ResourceUri : https://adnotifications.windowsazure.com/StrongAuthenticationService.svc/Connector

이렇게 해서 해결 완료!
결론..
"MS... 이자식들이.. SISISISISISISISI;;;;BALBALBALBALBALBAL;;;;;;;;;;;"
vCenter Server 앞단에 Nginx Proxy를 놓을 때, Proxy Setting Value
vCenter Server를 Public에 오픈하면서 SSL 인증서를 걸어야 했는데,
Let's encrypt 적용을 위해 Nginx Proxy를 걸었는데, 접속이 안된다.
다음의 설정을 적용해야 동작한다.
server {
   listen 443 ssl http2;
   server_name my_internet_vcenter_fqdn;
   ssl_certificate /etc/letsencrypt/live/my_letsencrypt_domain/fullchain.pem;
   ssl_certificate_key /etc/letsencrypt/live/my_letsencrypt_domain/privkey.pem;
   include /etc/letsencrypt/options-ssl-nginx.conf;

   location / {
      proxy_set_header Host "your_vCenter_fqdn";
      proxy_set_header Origin "your_vCenter_fqdn";
      proxy_set_header X-Real-IP $remote_addr;
      proxy_ssl_verify off;
      proxy_pass https://your_vCenter_fqdn;
      proxy_http_version 1.1;
      proxy_set_header Upgrade $http_upgrade;
      proxy_set_header Connection "upgrade";
      proxy_buffering off;
      client_max_body_size 0;
      proxy_read_timeout 36000s;
      proxy_redirect https://your_vCenter_fqdn/ https://my_internet_vcenter_fqdn/;
   }

   location /websso/SAML2 {
      sub_filter "your_vCenter_fqdn" "my_internet_vcenter_fqdn";
      proxy_set_header Host your_vCenter_fqdn;
      proxy_set_header X-Real-IP $remote_addr;
      proxy_ssl_verify off;
      proxy_pass https://your_vCenter_fqdn;
      proxy_http_version 1.1;
      proxy_set_header Upgrade $http_upgrade;
      proxy_set_header Connection "upgrade";
      proxy_buffering off;
      client_max_body_size 0;
      proxy_read_timeout 36000s;
      proxy_ssl_session_reuse on;
      proxy_redirect https://your_vCenter_fqdn/ https://my_internet_vcenter_fqdn/;
   }
}Wiki.js Install
https://docs.requarks.io/install/linux
Linux
Getting started with a Wiki.js installation on Linux
docs.requarks.io
Install
Download the latest version of Wiki.js:
wget https://github.com/Requarks/wiki/releases/latest/download/wiki-js.tar.gz
Extract the package to the final destination of your choice:
mkdir wiki
tar xzf wiki-js.tar.gz -C ./wiki
cd ./wiki
Rename the sample config file to config.yml:
mv config.sample.yml config.yml
Edit the config file and fill in your database and port settings (Configuration Reference):
nano config.yml
For SQLite installations only: (skip this step otherwise) Fetch native bindings for SQLite3:
npm rebuild sqlite3
Run Wiki.js
node server
Wait until you are invited to open to the setup page in your browser.
Complete the setup wizard to finish the installation.
Run as service
There are several solutions to run Wiki.js as a background service. We'll focus on systemd in this guide as it's available in nearly all linux distributions.
Create a new file named wiki.service inside directory /etc/systemd/system.
nano /etc/systemd/system/wiki.service
Paste the following contents (assuming your wiki is installed at /var/wiki):
[Unit]
Description=Wiki.js
After=network.target
[Service]
Type=simple
ExecStart=/usr/bin/node server
Restart=always
# Consider creating a dedicated user for Wiki.js here:
User=nobody
Environment=NODE_ENV=production
WorkingDirectory=/var/wiki
[Install]
WantedBy=multi-user.target
Save the service file (CTRL+X, followed by Y).
Reload systemd:
systemctl daemon-reload
Run the service:
systemctl start wiki
Enable the service on system boot.
systemctl enable wiki
Note: You can see the logs of the service using journalctl -u wiki
Intel 11세대 CPU 탑재 노트북에서 Win10/Win11 인식 안될 때
인텔 11세대 CPU 탑재 노트북이나 PC에서 Win10/Win11 등 Windows OS 설치시 디스크 표시가 안됨.
드라이버 로드가 반드시 필요함.
첨부의 파일을 압축풀고 설치 화면에서 드라이버 로드를 실시해서 디스크를 띄워줘야 한다.
Zabbix 6.0 with VMWare ESXi 8.0
1. Zabbix 6.0에는 VMWare Templete가 내장되어 있다.
2. Zabbix 6.0에서 VMWare ESXi를 모니터링 하기 위해서 다음의 세가지 매크로가 필요하다.
{$VMWARE.HV.UUID} {$VMWARE.PASSWORD} {$VMWARE.URL} {$VMWARE.USERNAME}
3. 기존 Zabbix 5.0에서는 {$VMWARE.HV.UUID} 가 없어도 모니터링이 됬으나, Zabbix 6.0에서는 필요하다.
4. 그리고 {$VMWARE.HV.UUID} 를 구하는 방법은 ESXi 7.0.3 이하와 8.0.0이 다르다.
- 7.0 이하 esxcli system uuid get
- 8.0 이상 vim-cmd hostsvc/hostsummary | grep uuid
5. 그리고 Zabbix에 호스트 등록시, Templeate는 VMWare 로.
- 이것으로 하면 하위 VM도 모두 디스커버리 등록된다.
6. 그리고, zabbix_server.conf에서 아래의 것 Enable 하고 서비스 재기동
StartVMwareCollectors=5
VMwareFrequency=60
VMwarePerfFrequency=60
VMwareCacheSize=8M
VMwareTimeout=10
TVHeadend on Ubuntu 22.04
TVHeadend install on ubuntu 22.04 server.
Repository에서 설치하는 방법으로 진행한다.
일반적인 검색에서는 snapd를 사용한 설치나 Docker 설치방법이 대부분 이지만, snapd를 사용하는 경우 DTV 사용시 Mux를 사용할 수 없다.
1) 리포지토리 등록
curl -1sLf \
  'https://dl.cloudsmith.io/public/tvheadend/tvheadend/setup.deb.sh' \
  | sudo -E bash
2) sudo apt-get update
3) sudo apt-get install tvheadend
Ubuntu의 18.04, 20.04, 22.04 LTS 버전에서는 모두 통용됨.
1. This way is stable on installed Ubuntu 22.04 Server Core
이 방법은 Ubuntu 22.04 Server Core가 설치된 상태를 기준으로 합니다. (Desktop 버전은 모름)
1) Asterisk 설치

sudo apt-get install unzip git gnupg2 curl libnewt-dev libssl-dev libncurses5-dev subversion libsqlite3-dev build-essential libjansson-dev libxml2-dev uuid-dev subversion
wget http://downloads.asterisk.org/pub/telephony/asterisk/asterisk-19-current.tar.gz
tar zxf asterisk-19-current.tar.gz
cd asterisk-19.*/
sudo ./contrib/scripts/get_mp3_source.sh
sudo ./contrib/scripts/install_prereq install
sudo ./configure
sudo make menuselect
(설치할 코덱 및 애드인 설치 요망)
sudo make -j2
sudo make install
sudo make samples
sudo make config
sudo ldconfig
sudo groupadd asterisk
sudo useradd -r -d /var/lib/asterisk -g asterisk asterisk
sudo usermod -aG audio,dialout asterisk
sudo chown -R asterisk.asterisk /etc/asterisk
sudo chown -R asterisk.asterisk /var/{lib,log,spool}/asterisk
sudo chown -R asterisk.asterisk /usr/lib/asterisk
sudo nano /etc/default/asterisk
(아래 내용 추가 또는 주석 해제)
AST_USER="asterisk"
AST_GROUP="asterisk"

sudo systemctl restart asterisk

sudo nano /etc/asterisk/cdr.conf
(아래 내용 수정)
[radius]
radiuscfg => /etc/radcli/radiusclient.conf

sudo nano /etc/asterisk/cel.conf
(아래 내용 수정)
[radius]
radiuscfg => /etc/radcli/radiusclient.conf

2) FreePBX 16 (사전에 apache, mariadb, php 7.4, nodejs 설치과정 포함)
sudo apt-get install apt-transport-https curl
sudo curl -o /etc/apt/trusted.gpg.d/mariadb_release_signing_key.asc 'https://mariadb.org/mariadb_release_signing_key.asc'
sudo sh -c "echo 'deb https://ftp.yz.yamagata-u.ac.jp/pub/dbms/mariadb/repo/10.10/ubuntu jammy main' >>/etc/apt/sources.list"
sudo apt-get update
sudo apt-get install mariadb-server
sudo mysql_secure_installation

sudo apt-get install software-properties-common
sudo add-apt-repository ppa:ondrej/php

sudo apt-get install apache2
sudo apt-get install php7.4 libapache2-mod-php7.4
sudo apt-get install php7.4-cgi php7.4-common php7.4-curl php7.4-mbstring php7.4-gd
sudo apt-get install php7.4-mysql php7.4-bcmath php7.4-zip php7.4-xml php7.4-imap php7.4-json php7.4-snmp
sudo apt-get install php-pear
sudo apt-get install nodejs npm
sudo apt-get install python3-certbot-apache

wget http://mirror.freepbx.org/modules/packages/freepbx/freepbx-16.0-latest.tgz
tar -xvzf freepbx-16.0-latest.tgz
cd freepbx
sudo ./install -n
sudo fwconsole ma downloadinstall certman
sudo fwconsole ma install pm2

sudo sed -i 's/^(User|Group).*/ asterisk/' /etc/apache2/apache2.conf
sudo sed -i 's/AllowOverride None/AllowOverride All/' /etc/apache2/apache2.conf
sudo sed -i 's/(^upload_max_filesize = )./2000M/' /etc/php/7.4/apache2/php.ini
sudo sed -i 's/(^upload_max_filesize = )./2000M/' /etc/php/7.4/cli/php.ini

sudo a2enmod rewrite
sudo apt-get install sox
sudo systemctl restart apache2VMWare ESXi 6.0 → 7.0 업그레이드 방안
Dell EMC 서버를 기준으로 작업 사항을 정한다.
ESXi 7.0의 2022.09.30 기준 최신버전은 Update 3g (20328353) 이다.
그러나, Dell EMC Customizing Version은 Update 3f (20036589) 이다.
1. 신규설치
1) ESXI 7.0 (VMware-VMvisor-Installer-7.0.0.update03-20036589.x86_64-DellEMC_Customized-A06.iso) 으로 설치한다.
2) ESXI를 유지보수모드로 전환한다.
2) SSH를 Enable 한다.
3) Putty로 SSH에 접속한다.
4) Filezilla 등 SFTP로 VMware-ESXi-7.0U3g-20328353-depot.zip 을 Datastore에 업로드 한다.
4) 아래 명령으로 업그레이드를 실시한다.
esxcli software profile update -p ESXi-7.0U3g-20328353-standard -d /vmfs/volumes/datastore1/VMware-ESXi-7.0U3g-20328353-depot.zip
# 만약, 7.0.3 설치 하드웨어가 4세대 Xeon 이전 CPU라면, 이후 릴리즈에서 지원하지 않을 수 있다는 경고가 표시되며 중지된다. 아래와 같이 옵션 추가를 한다.
esxcli software profile update -p ESXi-7.0U3g-20328353-standard -d /vmfs/volumes/datastore1/VMware-ESXi-7.0U3g-20328353-depot.zip --no-hardware-warning --no-sig-check
2. 기존서버 설치
1) ESXI 6.5로 업그레이드 설치한다. (VMware-VMvisor-Installer-201908001-14320405.x86_64.iso)
- MBR(BIOS) Boot로 설치한다.
2) ESXI 7.0 (VMware-VMvisor-Installer-7.0.0.update03-20036589.x86_64-DellEMC_Customized-A06.iso) 으로 설치한다.
- UEFI Boot로 설치한다. BIOS에서 UEFI Boot로 변경해야 한다.
- 7.0.3 버전은 TPM 및 Secure Boot를 지원하므로 Secure Boot를 켜주어야 한다.
3) ESXI를 유지보수모드로 전환한다.
4) SSH를 Enable 한다.
5) Putty로 SSH에 접속한다.
6) Filezilla 등 SFTP로 VMware-ESXi-7.0U3g-20328353-depot.zip 을 Datastore에 업로드 한다.
7) 아래 명령으로 업그레이드를 실시한다.
esxcli software profile update -p ESXi-7.0U3g-20328353-standard -d /vmfs/volumes/datastore1/VMware-ESXi-7.0U3g-20328353-depot.zip
esxcli software profile update -p ESXi-7.0U3g-20328353-standard -d /vmfs/volumes/datastore1/VMware-ESXi-7.0U3g-20328353-depot.zip --no-sig-check
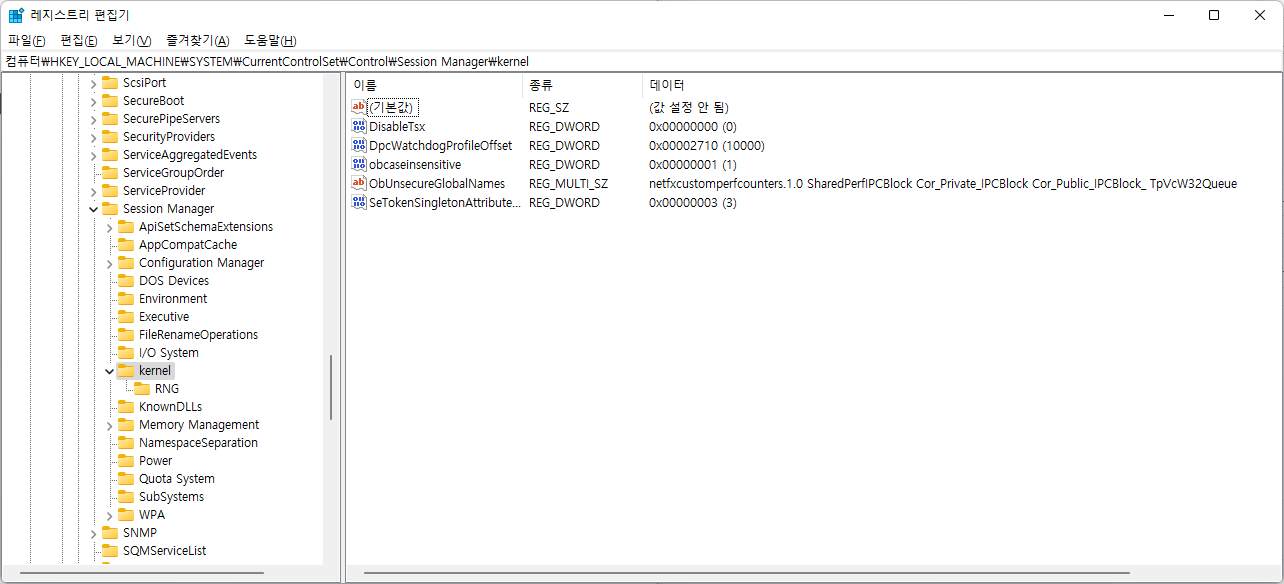
Win10에서 Intel TSX-NI 활성화/비활성화 (Active and deactive Intel TSX-NI on Win10)
인텔 TSX-NI 는 엔터프라이즈급 멀티쓰레드 성능 확장에 초점을 맞춘 명령어 세트로서 소프트웨어 쓰레드(threads) 및 락(lock)에 대한 향상된 제어를 통해 병렬 운영(parallel operations)의 효율성을 증가시켜준다.
1) Active
CMD 열고 실행
reg add "HKEY_LOCAL_MACHINE\SYSTEM\CurrentControlSet\Control\Session Manager\Kernel" /v DisableTsx /t REG_DWORD /d 1 /f
2) Deactive
CMD 열고 실행
reg add "HKEY_LOCAL_MACHINE\SYSTEM\CurrentControlSet\Control\Session Manager\Kernel" /v DisableTsx /t REG_DWORD /d 0 /f