

Cisco AP 리셋 및 초기세팅 방법
Cisco AP reset and initialize setting method.
1) Factory reset : press mode button and power on(plug in ethernet)
Wait to change led color to amber.
After changed LED to amber and wait 2~3 second, disconnect ethernet. (power off)
and reconnect ethernet (power on)
2) Setting on terminal (console to connect UART)
// GO TO SETTING
enable
// INITIAL PASSWORD is Cisco
Cisco
//show present IP
show ip int b
// go to configure mode
configure terminal
// Interface setting on Ethernet
interface bvi1
ip address 10.80.10.245 255.255.255.0
no shutdown
exit
// Common SSID setting
dot11 ssid [SSID]
authentication open
authentication key-management wpa version 2
guest-mode
wpa-psk ascii password [PASSWORD]
exit
// Set SSID to 2.4GHz radio
interface dot11radio0
encryption mode ciphers aes-ccm
ssid [SSID]
no shutdown
exit
// Set SSID to 5GHz radio
interface dot11radio1
encryption mode ciphers aes-ccm
ssid [SSID]
no shutdown
exit
// name server setting
ip name-server [DNS Server IP]
ip domain-lookup
ip default-gateway [Gateway IP]
exit
// Set to configuration to permanent
write
And disconnect ethernet and reconnect ethernet.
After boot AP, connect web console and set radio channel 2.4GHz/5GHz radio.
Win10 1703 이후부터 우클릭 CMD창 띄우는 법
윈10 최신 업데이트후 탐색기 쉬프트 우측 명령창 열기가 아닌 power shell 열기로 바뀌어진 분들에게
해당되는 팁입니다.
regedit 여시고
HKEY_CLASSES_ROOT\Directory\Background\shell
가시면 cmd가 있습니다
그 폴더의 권한을 취득하신후
HideBasedOnVelocityId 를 ShowBasedOnVelocityId 로 바꾸세요
Windows Registry Editor Version 5.00
; 마우스 우클릭 컨텍스트 메뉴 PowerShell -> CMD 변경 레지스트리
; extrememanual.net
[HKEY_CLASSES_ROOT\Directory\shell\cmdprompt]
@="@shell32.dll,-8506"
"Extended"=""
"NoWorkingDirectory"=""
[HKEY_CLASSES_ROOT\Directory\shell\cmdprompt\command]
@="cmd.exe /s /k pushd \"%V\""
[HKEY_CLASSES_ROOT\Directory\Background\shell\cmdprompt]
@="@shell32.dll,-8506"
"Extended"=""
"NoWorkingDirectory"=""
[HKEY_CLASSES_ROOT\Directory\Background\shell\cmdprompt\command]
@="cmd.exe /s /k pushd \"%V\""
[HKEY_CLASSES_ROOT\Drive\shell\cmdprompt]
@="@shell32.dll,-8506"
"Extended"=""
"NoWorkingDirectory"=""
[HKEY_CLASSES_ROOT\Drive\shell\cmdprompt\command]
@="cmd.exe /s /k pushd \"%V\""
RDP Wrapper Library v1.6.2
RDP Wrapper Library v1.6.2
binarymaster released this
- Installer updated
- RDP Config updated
- Added feature to allow custom start programs (#13 (comment))
- MSI installation package added (#14)
https://github.com/stascorp/rdpwrap/releases/tag/v1.6.2
Installshield silent install 파일 레코딩
Installshield make silent install record file. (setup.iss)
Creating InstallShield Response Files
You can use the InstallShield installations on the Tivoli Management Framework (1 of 2) CD to create custom silent installation for Windows and NetWare endpoints, Netware gateways, and Tivoli Desktop for Windows. You can use your custom installation to install these resources without user interaction.
The high-level process for creating custom installation for InstallShield images is as follows:
- To record a silent InstallShield installation, run the setup -r command.
- To play back a silent InstallShield installation, run the setup -s command.
For an example of this procedure, refer to Installing the Tivoli Desktop on Windows Systems Using an InstallShield Response File.
Recording the Response File
To start recording the response file, perform the following steps:
- Change to the directory containing the setup script.
- Run the following command:
setup -r -f1my_response_file.iss
where my_response_file is any name you want to use. Remember that -f1 uses the number 1 instead of the lowercase letter L.
For example, to create a response file for endpoint installation, you can call it endpoint.iss and store it in the c:\tivoli\endpoint\ directory. In this case, enter:
setup -r -f1c:\tivoli\endpoint\endpoint.iss
This action creates the response file in the designated location.
- Note:
- If no location is specified by the -f1 option, a setup.iss file is written to the %SystemRoot%\windir directory for Windows operating systems. For example on Windows NT, the directory might be c:\winnt; for Windows 98, it might be c:\windows.
- Complete the setup windows, actually completing a normal installation. The response file records all the setting specified.
At this point, you can install the endpoint in interactive mode, using setup.exe, or in unattended (or silent) mode, by pointing to the endpoint.iss file during playback.
- Note:
- There is also an -f2 option that is used to designate the location of the InstallShield log file. The InstallShield log file is created during the installation process. If no location is specified, the InstallShield log file is written to the same location as the response file.
Playing Back a Response File
After you have created your response file, you can run the installation. You can also copy the files to a network drive so that users can map to this drive and run the installation in interactive or unattended mode (depending on your business practices). When running the installation in unattended mode, no messages are displayed. All messages are written to the log file. Review this log file to determine the results of the installation.
To move the installation image to a network drive, perform the following steps:
- Copy the entire installation directory to a network drive.
- Copy the response file to this network drive.
- Create a shortcut to the setup.exe file.
- Rename the shortcut to something easily understood. In this case, consider endpoint.exe
- Modify the properties of the shortcut as follows (assume the new name):
- Right-click endpoint.exe and select Properties. The Properties window is displayed.
- In the Target field, add -s -f1response_file_path\endpoint.iss to the end of the command, where response_file_path is the full path to the response file.
For example, the response file is stored in the tivoli\endpoint directory, the information in the Target field would be as follows:
"c:\tivoli\endpoint\setup.exe" -s -f1c:\tivoli\endpoint\endpoint.iss
- Instruct users to map to this location and select the endpoint.exe file to install the endpoint.
- Note:
- With this design, users can run the command in interactive or unattended mode. To run in interactive mode, users select endpoint.exe. To run in unattended mode, users select endpoint.exe.
Alternatively, users can run the command from the command line. The general instructions to run a custom installation is to change to the directory containing the image and run the following command:
setup -s [-f1response_file] [-f2IS_log_file]
where:
- -s
- Specifies that the installation is to run in unattended mode.
- -f1response_file
- Specifies the file name and location of the customized response (.ISS) file. Do not include a space between -f1 and response_file. If you do not use this option, the default setup.iss file is used.
- -f2IS_log_file
- Specifies the file name and location where the InstallShield log files will be written. Do not include a space between -f2 and IS_log_file. If you do not use this option, the default setup.log file is created.
RS2 우클릭 컨텍스트메뉴 cmd 명령창과 파워쉘
RS2에서는 기본적으로 컨텍스트메뉴에서 SHIFT + 우클릭 할경우
CMP명령창 열기가 나오지 않고 , Power Shell로 열기 가 나옵니다.
그리고 시작메뉴에서 Win+X키로도 바뀌어있을텐데요.
아직 파워쉘에 익숙치 않아서인지 CMD명령창을 쓰고 싶습니다.
다음과 같은 방법으로 다시 나오게 할 수 있습니다.
1. 시작메뉴
작업표시줄 우클릭 - 작업표시줄 설정을 누르시면 윈도우 설정화면으로 진입합니다

아래 항목, 시작단추를 마우스 우클릭하거나 Win+X 키로 명령프롬프트를 파워쉘로 바꾸기가 있습니다.
끄기로 두시면 기존 명령프롬프트가 나오며

켜기로 하면 파워쉘로 바뀝니다.

이와 관련한 레지스트리는 다음과 같습니다.
아래를 reg파일로 저장해서 필요시 쓰면됩니다. 1, 0
단 reg로 적용하면 재부팅혹은 로그오프해야 적용됩니다.
Windows Registry Editor Version 5.00
;1이면 사용안함이므로 cmd열기가 나오며
;0이면 사용함이 되므로 파워쉘로열기가 나온다
[HKEY_CURRENT_USER\Software\Microsoft\Windows\CurrentVersion\Explorer\Advanced]
"DontUsePowerShellOnWinX"=dword:00000001
레지로 첨부해드립니다.
2. 바탕화면쉘, 폴더 우클릭 컨텍스트메뉴
우클릭에 관여하는 레지스트리는 다음 위치입니다.
HKEY_CLASSES_ROOT\Directory\Background
HKEY_CLASSES_ROOT\Directory\shell
RS2에서는
HKEY_CLASSES_ROOT\Directory\Background\shell\Powershell 부분과
HKEY_CLASSES_ROOT\Directory\Background\shell\cmd부분이 있는데요.
여기서 우측에 값을 보면
Dword 32비트 : HideBasedOnVelocityId
데이타 : 16진수 639bc8
로 되어 있습니다.
이부분을 지워주면
SHIFT+ 우클릭에서 명령창 열기가 나옵니다만 레지스트리에서는 이 레지권한변경을 해야 삭제가 되는부분이라 어려울수 있습니다.
따라서 하나더 cmdprompt 키로 추가해주면됩니다.

powershell 항목의 경우
Dword 32비트 : ShowBAseOnVelocityId
데이타 : 639bc8
입니다.
마찬가지로 powershell을 삭제해주면 되겠지만 권한이 필요한 부분이라 일반적으로는 삭제가 되지 않습니다.
따라서 숨기고 싶다면
poweshell2 등의 키를 하나더 추가하여 같은 양식으로 하되, ShowBaseOnvelocityId 값은 없이 만들어주면됩니다.

파워쉘도 때로 써야하므로 그대로 두고 추가적으로 cmd 명령프롬프트열기만 추가해주는 것이 좋습니다.
아래 레지를 병합해주면 됩니다.

출처: http://3jini.tistory.com/101 [3Jini's Enjoy]
RS2에서는 기본적으로 컨텍스트메뉴에서 SHIFT + 우클릭 할경우
CMP명령창 열기가 나오지 않고 , Power Shell로 열기 가 나옵니다.
그리고 시작메뉴에서 Win+X키로도 바뀌어있을텐데요.
아직 파워쉘에 익숙치 않아서인지 CMD명령창을 쓰고 싶습니다.
다음과 같은 방법으로 다시 나오게 할 수 있습니다.
1. 시작메뉴
작업표시줄 우클릭 - 작업표시줄 설정을 누르시면 윈도우 설정화면으로 진입합니다
아래 항목, 시작단추를 마우스 우클릭하거나 Win+X 키로 명령프롬프트를 파워쉘로 바꾸기가 있습니다.
끄기로 두시면 기존 명령프롬프트가 나오며
켜기로 하면 파워쉘로 바뀝니다.
이와 관련한 레지스트리는 다음과 같습니다.
아래를 reg파일로 저장해서 필요시 쓰면됩니다. 1, 0
단 reg로 적용하면 재부팅혹은 로그오프해야 적용됩니다.
Windows Registry Editor Version 5.00
;1이면 사용안함이므로 cmd열기가 나오며
;0이면 사용함이 되므로 파워쉘로열기가 나온다
[HKEY_CURRENT_USER\Software\Microsoft\Windows\CurrentVersion\Explorer\Advanced]
"DontUsePowerShellOnWinX"=dword:00000001
레지로 첨부해드립니다.
2. 바탕화면쉘, 폴더 우클릭 컨텍스트메뉴
우클릭에 관여하는 레지스트리는 다음 위치입니다.
HKEY_CLASSES_ROOT\Directory\Background
HKEY_CLASSES_ROOT\Directory\shell
RS2에서는
HKEY_CLASSES_ROOT\Directory\Background\shell\Powershell 부분과
HKEY_CLASSES_ROOT\Directory\Background\shell\cmd부분이 있는데요.
여기서 우측에 값을 보면
Dword 32비트 : HideBasedOnVelocityId
데이타 : 16진수 639bc8
로 되어 있습니다.
이부분을 지워주면
SHIFT+ 우클릭에서 명령창 열기가 나옵니다만 레지스트리에서는 이 레지권한변경을 해야 삭제가 되는부분이라 어려울수 있습니다.
따라서 하나더 cmdprompt 키로 추가해주면됩니다.
powershell 항목의 경우
Dword 32비트 : ShowBAseOnVelocityId
데이타 : 639bc8
입니다.
마찬가지로 powershell을 삭제해주면 되겠지만 권한이 필요한 부분이라 일반적으로는 삭제가 되지 않습니다.
따라서 숨기고 싶다면
poweshell2 등의 키를 하나더 추가하여 같은 양식으로 하되, ShowBaseOnvelocityId 값은 없이 만들어주면됩니다.
파워쉘도 때로 써야하므로 그대로 두고 추가적으로 cmd 명령프롬프트열기만 추가해주는 것이 좋습니다.
아래 레지를 병합해주면 됩니다.
출처: http://3jini.tistory.com/101 [3Jini's Enjoy]
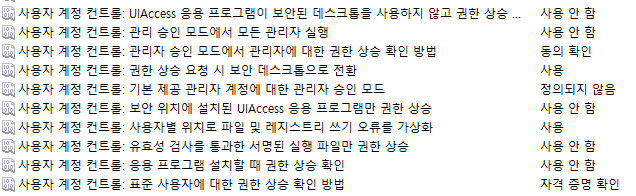
Force run administrator mode on Windows 10 Pro
윈도우10 실행되는 프로그램 무조건 관리자모드 실행
Danger! This is almost certainly a bad plan, for reasons explained in Ramhound's comment.
Run gpedit.msc to open the Local Group Policy Editor. Expand Computer Configuration, Windows Settings, Security Settings, Local Policies, and Security Options. Four settings need to be updated:
- Set "User Account Control: Behavior of the elevation prompt for administrators in Admin Approval Mode" to Elevate without prompting.
- Set "User Account Control: Detect application installations and prompt for elevation" to Disabled.
- Set "User Account Control: Run all administrators in Admin Approval Mode" to Disabled.
- Set "User Account Control: Only elevate UIAccess applications that are installed in secure locations" to Disabled.
The LGPE automatically saves all changes, so exit it and reboot.
Again, this is a very insecure configuration that you're creating here.
After install Raspbian Jessie - Change Hostname
modify this file
/etc/hostname
and reboot your raspberry pi.
After install Raspbian Jessie - Set IP static
1) /etc/network/interfaces
Modify and insert bold method.
auto lo
iface lo inet loopback
iface eth0 inet static
address 10.10.86.10
netmask 255.255.255.0
gateway 10.10.86.254
allow-hotplug wlan0
iface wlan0 inet manual
wpa-conf /etc/wpa_supplicant/wpa_supplicant.conf
allow-hotplug wlan1
iface wlan1 inet manual
wpa-conf /etc/wpa_supplicant/wpa_supplicant.conf
2) /etc/dhcpcd.conf
Insert following this to last row.
interface eth0
static ip_address=10.10.86.10
static routers=10.10.86.254
static domain_name_servers=10.10.86.254 8.8.8.8
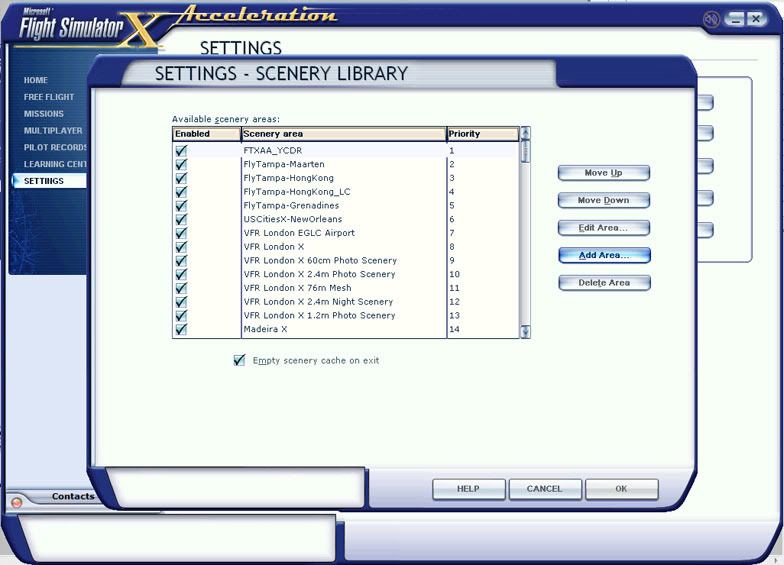
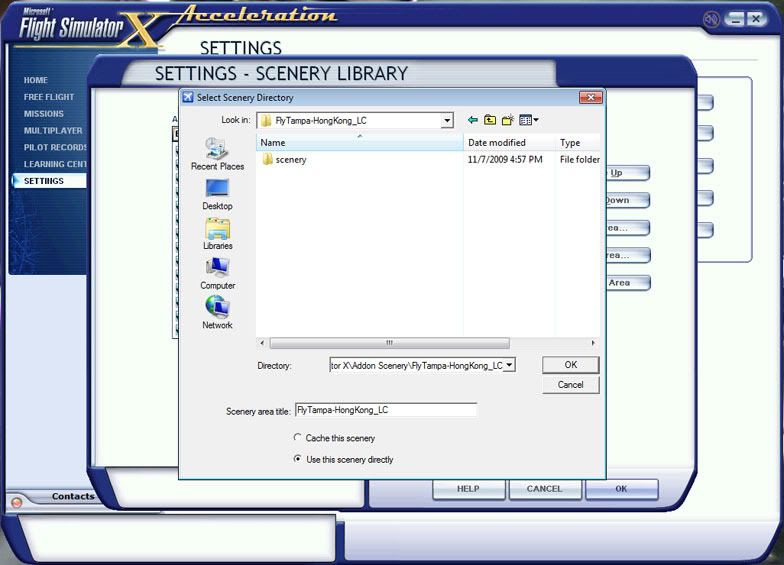
Windows 7 Scenery Addon Installation Bug Fix (FSX 시너리 등록 안될 때)


스마트폰의 통화품질은 OS와 Apps의 최적화가 좌우할 것
최근, 스마트폰이 많이 보급되면서 통화품질에 대한 논란이 끊이지 않고 있습니다. PDA+이동전화가 결합된 형태인만큼 통화품질에 대한 요소가 1차적으로 작용해야겠지요. 제목에서도 OS와 Apps의 최적화라고 결론을 지었습니다. 과거와는 달리 요즘은 웬만한 신호처리를 소프트웨어를 사용해 해결하는 추세에서는 하드웨어 성능이 받쳐준다는 전제하에 소프트웨어의 최적화가 선행되어야 할 것입니다.
최근에 출시되고 저도 쓰고 있는 갤럭시S(SHW-M130S)에만 해도 그렇습니다.
삼성 갤럭시S는 최고의 스펙으로 출시된 안드로이드 스마트폰입니다. 1G CPU를 채용하고 있으니까요.
그러나, 갤럭시S에 대한 불만들이 높습니다. 이유는 1차적으로 안드로이드 2.1(이클레어)이 갤럭시S의 스펙을 따라가지 못하는 것이 주 원인일 것이고(쉽게 말해 i7 PC에 윈도우98을 깔아놓은 격),2차적으로는 Google에서 설정한 안드로이드 2.1(이클레어)의 기본에서 제조사인 삼성전자가 각종 애플리케이션을 넣는 과정에서 상당한 커스터마이징이 가해졌는데 이 과정에서 상당한 부하가 걸리는 것이 신호처리에 영향을 주는 것으로 보여집니다.
이러한 문제때문에 유저들은 갤럭시S의 안드로이드 2.2(프로요)로의 업그레이드를 기다리고 있는 것입니다. 10/27일로 예정되어 있었는데 이동통신사와의 시험중 문제가 발견되어 11월 중으로 미루어졌다고 하네요.
왜 Apps의 최적화가 필요할까요? 하나하나 짚어보겠습니다.
여기서는 음성통화를 기준하여 예를 들도록 하겠습니다.
1. Vocoder(보코더:Voice Coder)
요즘에 이동통신을 접하는 초보자들에게는 생소한 단어일 것입니다. 이동전화에서 보코더는 CDMA 시스템에 해당되는 내용입니다. 보코더는 말 그대로 디지털로 들어온 음성신호를 아날로그로 변환해주는 장치입니다. 이 보코더가 음성통화에 중요한 역할을 합니다.
초기의 CDMA에서는 2.4 Kbps/4.8 Kbps IMBE(Improved Multi Band Excitation) 방식의 보코더를 사용했습니다. 이전의 FDMA(아날로그 휴대폰)보다는 더욱 깨끗한 통화품질을 나타내주었지만, 주변잡음의 처리에 있어서 상당히 약했습니다. IMBE방식의 보코더는 1998년까지 출시된 CDMA 이동전화에 대부분이 사용되었습니다.
1997년, PCS가 상용화됩니다. PCS에 사용된 보코더는 13K QCELP(정확히 말하면 13K QCELP와 IMBE 겸용) 입니다. 1.7GHz라는 높은 주파수 대역 덕분에 음성채널을 13kHz를 잡아넣어도 통화채널의 부하에 영향을 주지 않았고 통화품질도 4.8kbps인 IMBE보다는 더욱 깨끗한 품질을 유지할 수 있었습니다.
이에 발맞추어, SK텔레콤은 깜짝놀란 단어를 하나 들고 나옵니다.
EvRC(Enhanced Variable Rate Codec)입니다. 본래 EVRC기술은 1995년에 만들어 냈지만 국내 상용화에 적용된 것은 PCS가 나오기 시작한 1997년입니다. 셀룰러 대역인 800MHz의 낮은 주파수 대역에서 통화채널을 13kHz까지 끌어올리면 Cell 내에서의 통화채널이 상당히 줄어들어 버리기 때문에 품질을 끌어올리면서 충분한 채널대역을 확보하기 위해서는 8kbps의 EvRC 시스템이 적격이었을 것입니다.
SK텔레콤에서는 삼성전자 SCH-400 모델을 EvRC 보코더 채용으로 출시하여 처음으로 서비스를 하였습니다. 실제로 IMBE였던 SCH-370과 SCH-400과의 통화품질을 비교해보면 상대방 음성에 있어서는 음질이 비슷하거나 EvRC가 좀 더 큰 소리로 들린다는 느낌을 받았습니다만, 큰 차이를 느낄 수 있는 것은 주변잡음을 억제하는 능력이 나아졌다는 평가였습니다. 쉽게말해 좋았으면 좋았지 나쁘지는 않다는 것이 결론이지요.
나중에 PCS에서도 13K QCELP를 8K EvRC로 교환하여 사용하기에 이릅니다. 통화품질에 전혀 차이가 없으면서 늘어나는 통화채널의 확보를 위해서도 13kHz의 대역을 8kHz 대역으로 줄여야 하였기 때문이지요. 그래서 통화채널의 충분한 확보와 원활한 통화품질을 위해 PCS나 셀룰러 모두 EVRC를 채용하고 있습니다.
2. Vocoder의 하드웨어처리와 소프트웨어의 처리
EvRC 기술은 Qualcomm의 CDMA IC인 MSM2200. MSM2300에서는 별도의 EvRC 보코더 IC를 함께 탑재해야만 EVRC기능을 사용할 수 있었습니다.하지만 이후 MSM3000부터는 기본적으로 Chip의 내장되어 나왔습니다.
Qualcomm의 MSM~ 계열은 모두 CDMA IC 입니다. CDMA 신호처리와 디지털->아날로그(음성), 아날로그->디지털의 역할을 모두 수행하지요. 이 IC는 CDMA용이므로 CDMA에 관계된 기능만 수행합니다. 특화된 CPU 이지요.
피쳐폰의 보코더는 대부분 하드웨어에 의한 수행입니다. 과거에는 CDMA 마이크로프로세서인 MSM계열과는 별도의 보코더 IC를 사용해야 했고, 이후에는 MSM IC에 탑재가 됩니다. 어차피 프로세서 자체가 CDMA용이기 때문에 하드웨어에 의한 압축 및 해독이 이루어지지요.
통상의 피쳐폰(휴대폰)에는 모두 MSM계열이 들어갑니다. 그것을 가동하기 위한 마이콤 프로그램(펌웨어)의 용량도 작고 사용도 간단했습니다. 요즘 갤럭시S같은 폰에서나 보이는 프리징(Freezing) 현상은 피쳐폰에서는 있을 수 없는 이야기이지요.
하지만 전자기기의 대세는 어느 덧 하드웨어에 의존하는 시대에서 소형화/경량화/단순화에 발맞추어 점점 소프트웨어에 의존하는 시대가 되어버리고 맙니다. 휴대폰에서도 결국은 소프트웨어 보코더가 나오게 되지요.
소프트웨어에 의존하는 모든것은 중앙처리장치(CPU)에 부하를 주게 됩니다. 소프트웨어 처리능력은 결국 CPU와 메모리에 의존하게 되는것이지요. 컴퓨터에는 우선권이라는 것이 있습니다. 먼저 실행된 것이 먼저 처리되고 나중에 처리되는 것이 나중에 처리됩니다. 실행해야 할 일이 너무 많으면 CPU는 바빠지게 됩니다.
휴대폰에서도 마찬가지입니다. 온갖 소프트웨어가 실행되는 도중에 보코더 기능을 하는 소프트웨어도 일을 해야 한다고 하면 무지하게 바쁠 것 입니다. 부하가 상당히 걸리지요. CPU가 느려지기라도 하면 당연히 처리는 느려지겠지요. 통화품질도 여기서 차이가 날 것입니다. 들어오는 음성/나가는 음성을 처리해야 되는데 소프트웨어 보코더가 처리를 하지 못하면 음성에서 지연(delay)이 발생하거나 단절(cut)되게 됩니다. 이것이 문제가 되는 것입니다.
국내에 대충 어림잡아 2000년대부터 따지면 꽤 많은 종류의 스마트폰이 나왔습니다.
한 예로, 2000년 초반에 나온 삼성 Mits를 예로 들어보지요. 그중 SCH-M420/4300을 예로 설명합니다. SCH-M420은 Intel의 PXA270 400MHz CPU를 내장하고 있습니다. 이는 PDA OS인 Windows Mobile 2003을 구동시키기 위한 CPU입니다. CDMA쪽의 CPU는 따로 존재하고 있습니다. MSM4200이지요. 역시 EvRC는 내장되어 있습니다.
적어도 M420에서는 통화가 끊기거나 통화중 찢어지는 경우는 없습니다.
왜냐? CDMA를 위한 IC가 따로 있기 때문에 신호처리하는 상황에 있어 다중작업을 하는 CPU의 의존을 받지 않기 때문이지요.
이것이 요즘의 옴니아, 갤럭시 등으로 넘어오면서는 소프트웨어 보코더가 처리하게 됩니다.
갤럭시S와 옴니아, 아이폰이 통화품질의 뭇매를 맞는 이유는 바로 CPU와 OS, Phone Software에 있습니다.
최근의 스마트폰의 공통점은 WCDMA를 사용하면서 Qualcomm의 CPU를 사용하지 않습니다.
갤럭시S/옴니아는 삼성의 CPU를, 아이폰은 A3/A4 CPU를 사용합니다. 이들의 CPU는 Phone용 CPU가 아닙니다.
Embedded System용 CPU 입니다. Phone CPU보다는 범용의 처리능력을 가지고 있지요.
그래서 Windows Mobile/Android/MacOS X(iOS 4)와 같은 운영체제를 기반으로 구동이 가능합니다.
비록, Embedded OS이지만 기본적으로 CPU에 상당한 부하를 줍니다. 같은 Phone Software를 구동하였을 때 OS가 점유하고 있는 작업량이 줄어야 Phone Software가 처리하는데 영향을 주지 않을 것입니다.
기본적으로 컴퓨터가 부팅하면 서비스를 메모리에 로드하여 수행합니다. 여기서 서비스(Service)란 하드웨어를 구동하기 위한 소프트웨어 및 시스템 소프트웨어. 동작으로 위하여 미리 메모리에 로드되는 서비스를 말합니다. 이러한 서비스들은 기본적으로 전원을 켜면 자동으로 로드되어 메모리에 적재되고 CPU가 수시로 처리를 하게 됩니다.
이러한 서비스들이 많이 적재되어 있어 CPU에 부하를 주는 상태에서 Phone Software, 그것도 Real Time으로 처리해야 하는 Vocoder가 동작되면 느려질 가능성이 부단히 높지요. 이것은 통화품질에 막대한 영향을 끼칩니다.
3. 누가 잘못인가? 통신사냐? 제조사냐?
항상 통화품질에 대한 문제가 대두되면 제조사와 통신사는 서로 싸우게 됩니다.
제조사는 통신사의 망 문제를 이야기하고, 통신사는 단말기 불량으로 몰고갑니다.
정확히 말하면 통신사/제조사 쌍방과실입니다.
앞서 말한 것처럼, 제조사는 하드웨어와 소프트웨어의 최적화를 통해 Real-Time Vocoder 능력을 향상시켜줘야 합니다. 통신사는 당연히 망 확충이지요. 사실 SKT의 경우 WCDMA의 국내망은 충분히 구축이 되어 있습니다. 산 구석구석을 제외하고는 이제는 웬만하면 충분히 통화가 됩니다. 갑자기 증가되는 많은 통화량(서울 불꽃축제처럼 한 셀 내에 100만명이 동시에 통화하는 정도)을 처리할만큼의 확충이 안되있는 것이지 통화채널만 확보되면 원활한 통화가 가능할 정도의 시스템은 구축되어 있습니다.
그렇다면 제조사가 할 일이지요. 제조사는 소프트웨어의 최적화를 위해 노력해야 합니다.
그러나 통신사도 여기에 태클을 거는 경우도 있습니다.
갤럭시S 프로요 업데이트가 미뤄진 이유중 하나가 SKT와의 망 연동 테스트에서 태클을 걸었다는것인데
뉴스를 통해 알고보니 SKT기기에서는 억지로 포함되어야 할 NATE 등의 어플과의 충돌에 의해서라는 군요.
피쳐폰도 그랬지만 아무리 좋은 폰도 SKT의 요구에 따라 프로그램 몇 가지만 넣어도 그 품위가 상당히 떨어집니다.
그렇다면 답은 하나지요!
제조사와 통신사는 함께 소프트웨어를 연구하여 최적화에 노력해야 한다는 것이 결론일 것입니다!
