

RDP Wrapper Library v1.6.2
RDP Wrapper Library v1.6.2
binarymaster released this
- Installer updated
- RDP Config updated
- Added feature to allow custom start programs (#13 (comment))
- MSI installation package added (#14)
https://github.com/stascorp/rdpwrap/releases/tag/v1.6.2
Installshield silent install 파일 레코딩
Installshield make silent install record file. (setup.iss)
Creating InstallShield Response Files
You can use the InstallShield installations on the Tivoli Management Framework (1 of 2) CD to create custom silent installation for Windows and NetWare endpoints, Netware gateways, and Tivoli Desktop for Windows. You can use your custom installation to install these resources without user interaction.
The high-level process for creating custom installation for InstallShield images is as follows:
- To record a silent InstallShield installation, run the setup -r command.
- To play back a silent InstallShield installation, run the setup -s command.
For an example of this procedure, refer to Installing the Tivoli Desktop on Windows Systems Using an InstallShield Response File.
Recording the Response File
To start recording the response file, perform the following steps:
- Change to the directory containing the setup script.
- Run the following command:
setup -r -f1my_response_file.iss
where my_response_file is any name you want to use. Remember that -f1 uses the number 1 instead of the lowercase letter L.
For example, to create a response file for endpoint installation, you can call it endpoint.iss and store it in the c:\tivoli\endpoint\ directory. In this case, enter:
setup -r -f1c:\tivoli\endpoint\endpoint.iss
This action creates the response file in the designated location.
- Note:
- If no location is specified by the -f1 option, a setup.iss file is written to the %SystemRoot%\windir directory for Windows operating systems. For example on Windows NT, the directory might be c:\winnt; for Windows 98, it might be c:\windows.
- Complete the setup windows, actually completing a normal installation. The response file records all the setting specified.
At this point, you can install the endpoint in interactive mode, using setup.exe, or in unattended (or silent) mode, by pointing to the endpoint.iss file during playback.
- Note:
- There is also an -f2 option that is used to designate the location of the InstallShield log file. The InstallShield log file is created during the installation process. If no location is specified, the InstallShield log file is written to the same location as the response file.
Playing Back a Response File
After you have created your response file, you can run the installation. You can also copy the files to a network drive so that users can map to this drive and run the installation in interactive or unattended mode (depending on your business practices). When running the installation in unattended mode, no messages are displayed. All messages are written to the log file. Review this log file to determine the results of the installation.
To move the installation image to a network drive, perform the following steps:
- Copy the entire installation directory to a network drive.
- Copy the response file to this network drive.
- Create a shortcut to the setup.exe file.
- Rename the shortcut to something easily understood. In this case, consider endpoint.exe
- Modify the properties of the shortcut as follows (assume the new name):
- Right-click endpoint.exe and select Properties. The Properties window is displayed.
- In the Target field, add -s -f1response_file_path\endpoint.iss to the end of the command, where response_file_path is the full path to the response file.
For example, the response file is stored in the tivoli\endpoint directory, the information in the Target field would be as follows:
"c:\tivoli\endpoint\setup.exe" -s -f1c:\tivoli\endpoint\endpoint.iss
- Instruct users to map to this location and select the endpoint.exe file to install the endpoint.
- Note:
- With this design, users can run the command in interactive or unattended mode. To run in interactive mode, users select endpoint.exe. To run in unattended mode, users select endpoint.exe.
Alternatively, users can run the command from the command line. The general instructions to run a custom installation is to change to the directory containing the image and run the following command:
setup -s [-f1response_file] [-f2IS_log_file]
where:
- -s
- Specifies that the installation is to run in unattended mode.
- -f1response_file
- Specifies the file name and location of the customized response (.ISS) file. Do not include a space between -f1 and response_file. If you do not use this option, the default setup.iss file is used.
- -f2IS_log_file
- Specifies the file name and location where the InstallShield log files will be written. Do not include a space between -f2 and IS_log_file. If you do not use this option, the default setup.log file is created.
LG V20 US996 10n Deodex Completed

며칠 테스트하고 공개할까 합니다.
일단 제 폰에서는 잘 돕니다.
RS2 우클릭 컨텍스트메뉴 cmd 명령창과 파워쉘
RS2에서는 기본적으로 컨텍스트메뉴에서 SHIFT + 우클릭 할경우
CMP명령창 열기가 나오지 않고 , Power Shell로 열기 가 나옵니다.
그리고 시작메뉴에서 Win+X키로도 바뀌어있을텐데요.
아직 파워쉘에 익숙치 않아서인지 CMD명령창을 쓰고 싶습니다.
다음과 같은 방법으로 다시 나오게 할 수 있습니다.
1. 시작메뉴
작업표시줄 우클릭 - 작업표시줄 설정을 누르시면 윈도우 설정화면으로 진입합니다

아래 항목, 시작단추를 마우스 우클릭하거나 Win+X 키로 명령프롬프트를 파워쉘로 바꾸기가 있습니다.
끄기로 두시면 기존 명령프롬프트가 나오며

켜기로 하면 파워쉘로 바뀝니다.

이와 관련한 레지스트리는 다음과 같습니다.
아래를 reg파일로 저장해서 필요시 쓰면됩니다. 1, 0
단 reg로 적용하면 재부팅혹은 로그오프해야 적용됩니다.
Windows Registry Editor Version 5.00
;1이면 사용안함이므로 cmd열기가 나오며
;0이면 사용함이 되므로 파워쉘로열기가 나온다
[HKEY_CURRENT_USER\Software\Microsoft\Windows\CurrentVersion\Explorer\Advanced]
"DontUsePowerShellOnWinX"=dword:00000001
레지로 첨부해드립니다.
2. 바탕화면쉘, 폴더 우클릭 컨텍스트메뉴
우클릭에 관여하는 레지스트리는 다음 위치입니다.
HKEY_CLASSES_ROOT\Directory\Background
HKEY_CLASSES_ROOT\Directory\shell
RS2에서는
HKEY_CLASSES_ROOT\Directory\Background\shell\Powershell 부분과
HKEY_CLASSES_ROOT\Directory\Background\shell\cmd부분이 있는데요.
여기서 우측에 값을 보면
Dword 32비트 : HideBasedOnVelocityId
데이타 : 16진수 639bc8
로 되어 있습니다.
이부분을 지워주면
SHIFT+ 우클릭에서 명령창 열기가 나옵니다만 레지스트리에서는 이 레지권한변경을 해야 삭제가 되는부분이라 어려울수 있습니다.
따라서 하나더 cmdprompt 키로 추가해주면됩니다.

powershell 항목의 경우
Dword 32비트 : ShowBAseOnVelocityId
데이타 : 639bc8
입니다.
마찬가지로 powershell을 삭제해주면 되겠지만 권한이 필요한 부분이라 일반적으로는 삭제가 되지 않습니다.
따라서 숨기고 싶다면
poweshell2 등의 키를 하나더 추가하여 같은 양식으로 하되, ShowBaseOnvelocityId 값은 없이 만들어주면됩니다.

파워쉘도 때로 써야하므로 그대로 두고 추가적으로 cmd 명령프롬프트열기만 추가해주는 것이 좋습니다.
아래 레지를 병합해주면 됩니다.

출처: http://3jini.tistory.com/101 [3Jini's Enjoy]
RS2에서는 기본적으로 컨텍스트메뉴에서 SHIFT + 우클릭 할경우
CMP명령창 열기가 나오지 않고 , Power Shell로 열기 가 나옵니다.
그리고 시작메뉴에서 Win+X키로도 바뀌어있을텐데요.
아직 파워쉘에 익숙치 않아서인지 CMD명령창을 쓰고 싶습니다.
다음과 같은 방법으로 다시 나오게 할 수 있습니다.
1. 시작메뉴
작업표시줄 우클릭 - 작업표시줄 설정을 누르시면 윈도우 설정화면으로 진입합니다
아래 항목, 시작단추를 마우스 우클릭하거나 Win+X 키로 명령프롬프트를 파워쉘로 바꾸기가 있습니다.
끄기로 두시면 기존 명령프롬프트가 나오며
켜기로 하면 파워쉘로 바뀝니다.
이와 관련한 레지스트리는 다음과 같습니다.
아래를 reg파일로 저장해서 필요시 쓰면됩니다. 1, 0
단 reg로 적용하면 재부팅혹은 로그오프해야 적용됩니다.
Windows Registry Editor Version 5.00
;1이면 사용안함이므로 cmd열기가 나오며
;0이면 사용함이 되므로 파워쉘로열기가 나온다
[HKEY_CURRENT_USER\Software\Microsoft\Windows\CurrentVersion\Explorer\Advanced]
"DontUsePowerShellOnWinX"=dword:00000001
레지로 첨부해드립니다.
2. 바탕화면쉘, 폴더 우클릭 컨텍스트메뉴
우클릭에 관여하는 레지스트리는 다음 위치입니다.
HKEY_CLASSES_ROOT\Directory\Background
HKEY_CLASSES_ROOT\Directory\shell
RS2에서는
HKEY_CLASSES_ROOT\Directory\Background\shell\Powershell 부분과
HKEY_CLASSES_ROOT\Directory\Background\shell\cmd부분이 있는데요.
여기서 우측에 값을 보면
Dword 32비트 : HideBasedOnVelocityId
데이타 : 16진수 639bc8
로 되어 있습니다.
이부분을 지워주면
SHIFT+ 우클릭에서 명령창 열기가 나옵니다만 레지스트리에서는 이 레지권한변경을 해야 삭제가 되는부분이라 어려울수 있습니다.
따라서 하나더 cmdprompt 키로 추가해주면됩니다.
powershell 항목의 경우
Dword 32비트 : ShowBAseOnVelocityId
데이타 : 639bc8
입니다.
마찬가지로 powershell을 삭제해주면 되겠지만 권한이 필요한 부분이라 일반적으로는 삭제가 되지 않습니다.
따라서 숨기고 싶다면
poweshell2 등의 키를 하나더 추가하여 같은 양식으로 하되, ShowBaseOnvelocityId 값은 없이 만들어주면됩니다.
파워쉘도 때로 써야하므로 그대로 두고 추가적으로 cmd 명령프롬프트열기만 추가해주는 것이 좋습니다.
아래 레지를 병합해주면 됩니다.
출처: http://3jini.tistory.com/101 [3Jini's Enjoy]
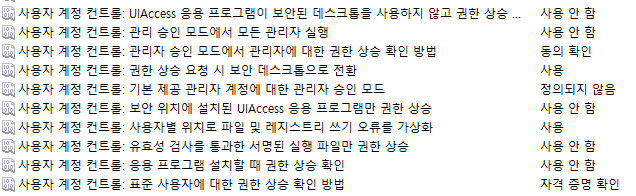
Force run administrator mode on Windows 10 Pro
윈도우10 실행되는 프로그램 무조건 관리자모드 실행
Danger! This is almost certainly a bad plan, for reasons explained in Ramhound's comment.
Run gpedit.msc to open the Local Group Policy Editor. Expand Computer Configuration, Windows Settings, Security Settings, Local Policies, and Security Options. Four settings need to be updated:
- Set "User Account Control: Behavior of the elevation prompt for administrators in Admin Approval Mode" to Elevate without prompting.
- Set "User Account Control: Detect application installations and prompt for elevation" to Disabled.
- Set "User Account Control: Run all administrators in Admin Approval Mode" to Disabled.
- Set "User Account Control: Only elevate UIAccess applications that are installed in secure locations" to Disabled.
The LGPE automatically saves all changes, so exit it and reboot.
Again, this is a very insecure configuration that you're creating here.
After install Raspbian Jessie - Change Hostname
modify this file
/etc/hostname
and reboot your raspberry pi.
After install Raspbian Jessie - Set IP static
1) /etc/network/interfaces
Modify and insert bold method.
auto lo
iface lo inet loopback
iface eth0 inet static
address 10.10.86.10
netmask 255.255.255.0
gateway 10.10.86.254
allow-hotplug wlan0
iface wlan0 inet manual
wpa-conf /etc/wpa_supplicant/wpa_supplicant.conf
allow-hotplug wlan1
iface wlan1 inet manual
wpa-conf /etc/wpa_supplicant/wpa_supplicant.conf
2) /etc/dhcpcd.conf
Insert following this to last row.
interface eth0
static ip_address=10.10.86.10
static routers=10.10.86.254
static domain_name_servers=10.10.86.254 8.8.8.8
LG US996 EvDO Enable - Part.2
1. Shortcut Master Download and Install
2. Hidden Menu Open
3. Search "com.lge.hiddenmenu.FieldTest.LTEDataTest"
4. Check to "Rmnet AutoConnect Mode"
5. Reboot and Enjoy!
PS. Must off NAOTest.
LG US996 Enable EVDO
1) Install Shortcut Master
2) Search "NAOTest" activity in Hidden Menu
3) Enable "NAOTest"
4) Set carrier to VZW(Verizon)
5) Reboot
6) Enjoy EVDO or 1x
