


윈도우 화면 방향에 따라 바탕화면 바꾸는 프로그램 - Auto Wallpaper
https://www.mediafire.com/file/r84rkrw1dq43hvi/auto_wallpaper-1.0.0.zip/file
auto_wallpaper-1.0.0
www.mediafire.com
윈도우OS에서 화면 방향에 따라 바탕화면 배경 바꿔주는 프로그램
윈도우 태블릿에 편하다.
SSL Keystore JKS file to Nginx CERT File Format Output
keytool을 이용하여 jks파일에서 pkcs12 포맷형태로 키파일 추출
keytool -importkeystore -srckeystore keystore.jks -destkeystore output_file.p12 -deststoretype PKCS12cert 파일 추출
openssl pkcs12 -in outputed_file.p12 -out cert_file.pem -clcerts -nokeys
key파일 추출
openssl pkcs12 -in output_file.p12 -out key_file.key -nocerts -des
D-STAR Hotspot firmware update on Pi-Star OS
You can always check the ZUMspot/MMDVM_HS firmware releases on Andy's juribeparada / MMDVM_HS GitHub releases page: https://github.com/juribeparada/MMDVM_HS/releases. Version 1.4.12 was released earlier this week, I think on Nov 4th.
And just for reference, here are the Pi-Star commands for the scripts to update various devices via Pi-Star SSH access:
ZUMspot board connected to GPIO:
Code: Select all
sudo pistar-zumspotflash rpiZUMspot duplex board connected to GPIO:
Code: Select all
sudo pistar-zumspotflash rpi_duplexZUMspot USB key:
Code: Select all
sudo pistar-zumspotflash usbUSB-connected Libre Modem:
Code: Select all
sudo pistar-zumspotflash libreMMDVM_HS_Hat board with 14.7456 MHz TCXO1 connected to GPIO:
Code: Select all
sudo pistar-mmdvmhshatflash hs_hatMMDVM_HS_Hat board with 12.288 MHz TCXO connected to GPIO:
Code: Select all
sudo pistar-mmdvmhshatflash hs_hat-12mhzMMDVM_HS_DUAL_Hat board with 14.7456 MHz TCXO connected to GPIO:
Code: Select all
sudo pistar-mmdvmhshatflash hs_dual_hatMMDVM_HS_DUAL_Hat board with 12.288 MHz TCXO connected to GPIO:
Code: Select all
sudo pistar-mmdvmhshatflash hs_dual_hat-12mhzNano Hat board connected to GPIO:
Code: Select all
sudo pistar-nanohsflash nano_hsNanoDV NPi board:
Code: Select all
sudo pistar-nanodvflash piNanoDV USB board:
Code: Select all
sudo pistar-nanodvflash usbBD7KLE/BG3MDO devices:
Code: Select all
sudo pistar-mdoflashVTiger CRM 설치방법 (Ubuntu 20.04, MariaDB)
https://sourceforge.net/projects/vtigercrm/
Vtiger CRM
Download Vtiger CRM for free. An enterprise-class CRM and more! Vtiger CRM enables sales, support, and marketing teams to organize and collaborate to measurably improve customer experiences and business outcomes. Vtiger CRM also includes email, inventory,
sourceforge.net
https://websiteforstudents.com/install-vtiger-crm-on-ubuntu-16-04-lts-with-apache2-mariadb-and-php-7-1-support/
Install vTiger CRM on Ubuntu 16.04 LTS with Apache2, MariaDB and PHP 7.1 Support - Website for Students
When looking for enterprise Customer Relationship Management platform for your business, Vtiger CRM is a good place to start. this open source CRM software is
websiteforstudents.com
Step 1: Install Apache2
Vtiger CRM requires a webserver and the most popular webserver in use today is Apache2. So, go and install Apache2 on Ubuntu by running the commands below:
sudo apt update
sudo apt install apache2
After installing Apache2, run the commands below to disable directory listing.
sudo sed -i "s/Options Indexes FollowSymLinks/Options FollowSymLinks/" /etc/apache2/apache2.conf
Next, run the commands below to stop, start and enable Apache2 service to always start up with the server boots.
sudo systemctl stop apache2.service
sudo systemctl start apache2.service
sudo systemctl enable apache2.service
Step 2: Install MariaDB
Vtiger also requires a database server. and MariaDB database server is a great place to start. To install it run the commands below.
sudo apt-get install mariadb-server mariadb-client
After installing, the commands below can be used to stop, start and enable MariaDB service to always start up when the server boots.
sudo systemctl stop mysql.service
sudo systemctl start mysql.service
sudo systemctl enable mysql.service
After that, run the commands below to secure MariaDB server.
sudo mysql_secure_installation
When prompted, answer the questions below by following the guide.
- Enter current password for root (enter for none): Just press the Enter
- Set root password? [Y/n]: Y
- New password: Enter password
- Re-enter new password: Repeat password
- Remove anonymous users? [Y/n]: Y
- Disallow root login remotely? [Y/n]: Y
- Remove test database and access to it? [Y/n]: Y
- Reload privilege tables now? [Y/n]: Y
Restart MariaDB server
sudo systemctl restart mysql.service
Step 3: Install PHP and Related Modules
PHP 7.1 isn’t available on Ubuntu default repositories… in order to install it, you will have to get it from third-party repositories.
Run the commands below to add the below third party repository to upgrade to PHP 7.1
sudo apt-get install software-properties-common
sudo add-apt-repository ppa:ondrej/php
Then update and upgrade to PHP 7.1
sudo apt update
Run the commands below to install PHP 7.1 and related modules.
sudo apt install php7.1 libapache2-mod-php7.1 php7.1-common php7.1-mbstring php7.1-xmlrpc php7.1-soap php7.1-gd php7.1-xml php7.1-intl php7.1-mysql php7.1-cli php7.1-mcrypt php7.1-ldap php7.1-zip php7.1-curl
After install PHP, run the commands below to open Apache2 PHP default file.
sudo nano /etc/php/7.1/apache2/php.ini
Then make the change the following lines below in the file and save.
file_uploads = On
allow_url_fopen = On
memory_limit = 256M
upload_max_filesize = 64M
max_execution_time = 30
display_errors = Off
max_input_vars = 1500
date.timezone = America/Chicago
Step 4: Create Vtiger Database
Now that you’ve install all the packages that are required, continue below to start configuring the servers. First run the commands below to create Vtiger database.
Run the commands below to logon to the database server. When prompted for a password, type the root password you created above.
sudo mysql -u root -p
Then create a database called vtigercrmdb
CREATE DATABASE vtigercrmdb;
Create a database user called vtigercrmuser with new password
CREATE USER 'vtigercrmuser'@'localhost' IDENTIFIED BY 'new_password_here';
Then grant the user full access to the database.
GRANT ALL ON vtigercrmdb.* TO 'vtigercrmuser'@'localhost' IDENTIFIED BY 'user_password_here' WITH GRANT OPTION;
Finally, save your changes and exit.
FLUSH PRIVILEGES;
EXIT;
Step 5: Download Vtiger Latest Release
Next, visit Vtiger site and download the latest version.
After downloading, run the commands below to extract the download file into Apache2 root directory.
cd /tmp && wget https://sourceforge.net/projects/vtigercrm/files/vtiger%20CRM%207.0.1/Core%20Product/vtigercrm7.0.1.tar.gz
tar xzf vtigercrm7.0.1.tar.gz
sudo mv vtigercrm /var/www/html/vtigercrm
Then run the commands below to set the correct permissions for Concrete5 to function.
sudo chown -R www-data:www-data /var/www/html/vtigercrm/
sudo chmod -R 755 /var/www/html/vtigercrm/
Step 6: Configure Apache2
Finally, configure Apahce2 site configuration file for Vtiger. This file will control how users access Vtiger content. Run the commands below to create a new configuration file called vtigercrm.conf
sudo nano /etc/apache2/sites-available/vtigercrm.conf
Then copy and paste the content below into the file and save it. Replace the highlighted line with your own domain name and directory root location.
<VirtualHost *:80>
     ServerAdmin admin@example.com
     DocumentRoot /var/www/html/vtigercrm/
     ServerName example.com
     ServerAlias www.example.com

     <Directory /var/www/html/vtigercrm/>
        Options +FollowSymlinks
        AllowOverride All
        Require all granted
     </Directory>

     ErrorLog ${APACHE_LOG_DIR}/error.log
     CustomLog ${APACHE_LOG_DIR}/access.log combined

</VirtualHost>
Save the file and exit.
Step 7: Enable the Vtiger and Rewrite Module
After configuring the VirtualHost above, enable it by running the commands below
sudo a2ensite vtigercrm.conf
sudo a2enmod rewrite
Step 8 : Restart Apache2
To load all the settings above, restart Apache2 by running the commands below.
sudo systemctl restart apache2.service
Then open your browser and browse to the server domain name followed by install. You should see Concrete5 setup wizard to complete. Please follow the wizard carefully.
Then follow the on-screen instructions until you’ve successfully installed Vtiger.
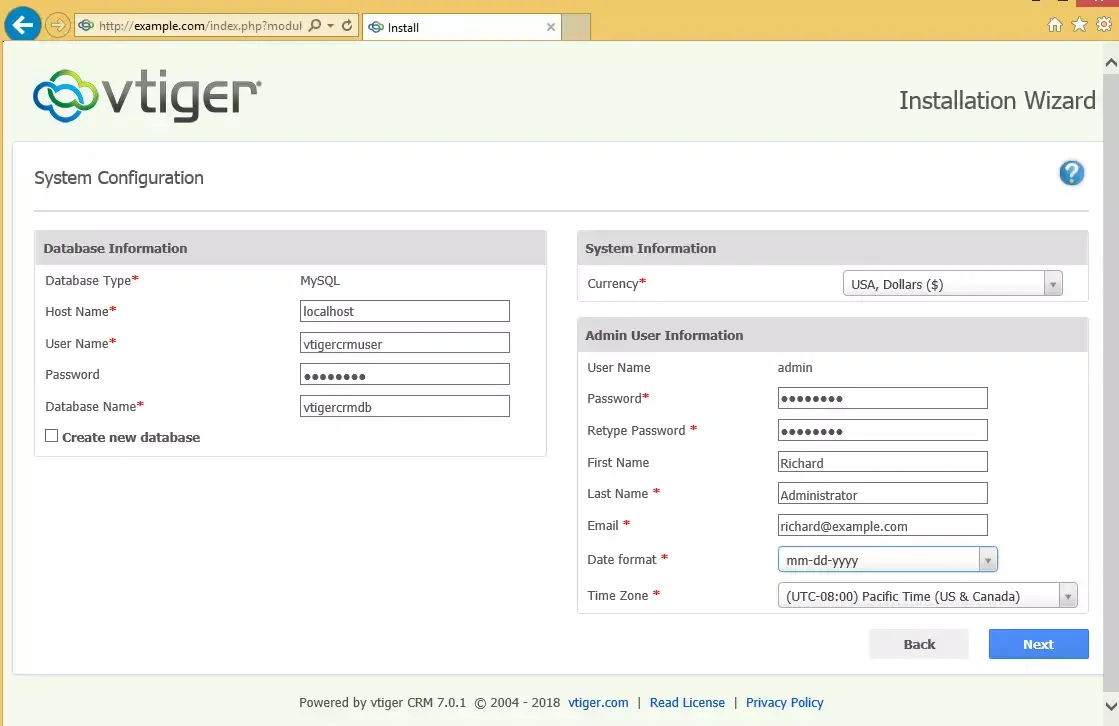
Type the database info and create an admin account for the portal.
After a brief time, the installation should complete and the platform ready to be used.
Enjoy!
You may also like the post below:
imuz 컨버터11 윈도우 태블릿에 윈도우11 설치하기

사실 윈도우 태블릿의 강자라면 MS의 서피스가 답인데, 서피스는 아무리 사양이 낮은 제품도 가격이 그렇게 착하진 않다보니 저렴하게 사용할 윈도우 태블릿으로 imuz 컨버터11을 구입하게 되었다. 물론, 새것으로 구입하지 못하고 다른 사람으로 부터 얼마 사용하지 않은 제품을 저렴하게 양도 받았는데, 셀러론CPU에 4GB RAM 까지는 그런대로 괜찮은데 이 태블릿에 내장된 삼성 CJNB4R 64GB eMMC SSD의 성능이 아주 지랄인지라 체감속도에서는 좀 실망한 모델이긴 하다. 사실 필기를 주로 사용하려고 구입했는데 필기도 광고에서만큼 깔끔하게 써지지 않은 것은 물론이고 동봉되어 있던 도킹 키보드도 내구성이 좋지 않아 오타가 작렬하고 터치패드 마우스도 자기 멋대로 동작하는 등 불만이 많은 제품이긴 한데 도킹키보드는 아예 박스에 다시 싸서 집에 놔두고, 펜은 그냥 가볍게 쓰는 정도로 사용하고 있다.
최근 윈도우11이 나오면서 노트북에 설치해보니 UI와 UX가 나름 마음에 드는지라 태블릿에도 설치하고 싶어서 이 컨버터11에도 설치하려고 했는데 그냥은 설치가 안되는 것이, TPM 1.2로 인식하는데다가 64GB 스토리지지만 스토리지 뒤편에 10GB정도의 복구 파티션이 존재해서 부족한 용량으로 인식하여 업그레이드 설치가 되지 않는다.
이에 컨버터11에다가 윈도우11의 설치를 성공하여 이 블로그에 공개한다.
1. 윈도우11 설치에서 포기해야 할 것이 있다.
1) imuz 출고시에 만들어진 복구 파티션 (복구파티션에는 Win10 Home 20H2가 들어있다)
2) SSD 포맷
2. TPM 1.2 --> TPM 2.0으로 BIOS 변경
저렴한 태블릿이라 TPM 2.0이 되는가 했는데, BIOS 옵션에 있기는 있다.
도킹키보드를 연결한 상태에서 전원을 완전히 껐다가 켜면서 F1과 DEL을 번갈아 누르다 보면 CMOS 화면이 표시된다.
Advanced 메뉴에 Trusted Platform 메뉴에 들어가면 아래 그림과 같은 메뉴가 나오는데, 맨 아래 Device Select가
Auto로 세팅되어 있다. 이렇게 되면 TPM 1.2로 인식한다. 수동으로 TPM 2.0으로 고정 변경해 주고 BIOS 설정을
저장한다.


3. 윈도우11 설치
윈도우11 ISO를 다운로드 받고, USB에 굽는다. 그리고 CMOS 화면에서 바로 USB로 부팅하는 것이 좋다.
컨버터 11은 부팅 디바이스 선택 단축키가 없다.

TPM 2.0으로 변경했지만, CPU가 설치가 불가능한 CPU이다. 그리고 64GB SSD 라고 하지만 eMMC다 보니
사양체크에서 설치를 거부할 것이다.
윈도우11 부팅USB를 만들면서 아래 가이드에 있는 REG 파일을 넣어두고, 윈도우 설치를 시작하면서 우회 레지스트리
를 적용한다.
https://extrememanual.net/38862
윈도우11 TPM 없이 우회 설치하는 방법 - 익스트림 매뉴얼
이 PC에서는 Windows 11을 실행할 수 없음이 PC는 이 Windows 버전을 설치하기 위한 최소 시스템 요구 사항을 충족하지 않았습니다. 자세한 내용은 https://aka.ms/WindowsSysReq 방문하세요. 윈도우11을 설치할
extrememanual.net
설치하면서, 기존에 SSD에 있는 파티션을 모두 제거하고 설치한다.
파티션은 알아서 만들어 낸다.

그리고, 설치 시작.

설치가 잘 완료된다.


윈도우11 설치가 잘 완료되면, 드라이버는 반드시 설치해야 한다.
아래 imuz 자료실에 있는 통합 드라이버로 설치한다. 모든 드라이버가 잘 설치될 것이다.
https://shop.imuz.com/board/view.php?&bdId=data&sno=508
대한민국 브랜드, 아이뮤즈
가성비 노트북, 학생노트북, 직장인/사무용 노트북, 안드로이드 태블릿, 윈도우 태블릿, 전자출입명부 태블릿
shop.imuz.com

이게 실제 설치된 화면이다.

컨버터11 자체가 Win10 Home이 제공된 제품이다 보니 정품인증도 자동으로 되어 있다.
윈도우11을 컨버터11에서 사용하고자 한다면, 이와 같은 방법으로 도전해 보기를 바란다.
Azure Storage Account에서 NFSv3 활성화
기본적으로 Azure Storage Account 생성 후, Storage 생성할 때 NFSv3는 활성화 되어 있지 않음.
기본적인 Bulb storage는 SMB 프로토콜을 사용함. SAMBA로 마운트할 수 있으나 속도가 느림.
Azure CLI에서 아래와 같이 현재 사용하는 Subscription(구독)에 Enable 해주어야 NFSv3 스토리지 사용이 가능함.

Windows Server 20H2 Feature List
20H2 설치 후 커맨드 라인으로 기능설치시 활용바람.
Get-WindowsFeature -Name *gui*
Display Name Name Install State
------------ ---- -------------
[ ] Active Directory Certificate Services AD-Certificate Available
[ ] Certification Authority ADCS-Cert-Authority Available
[ ] Certificate Enrollment Policy Web Service ADCS-Enroll-Web-Pol Available
[ ] Certificate Enrollment Web Service ADCS-Enroll-Web-Svc Available
[ ] Certification Authority Web Enrollment ADCS-Web-Enrollment Available
[ ] Network Device Enrollment Service ADCS-Device-Enrollment Available
[ ] Online Responder ADCS-Online-Cert Available
[ ] Active Directory Domain Services AD-Domain-Services Available
[ ] Active Directory Federation Services ADFS-Federation Available
[ ] Active Directory Lightweight Directory Services ADLDS Available
[ ] Active Directory Rights Management Services ADRMS Available
[ ] Active Directory Rights Management Server ADRMS-Server Available
[ ] Identity Federation Support ADRMS-Identity Available
[ ] Device Health Attestation DeviceHealthAttestat... Available
[ ] DHCP Server DHCP Available
[ ] DNS Server DNS Available
[X] File and Storage Services FileAndStorage-Services Installed
[ ] File and iSCSI Services File-Services Available
[ ] File Server FS-FileServer Available
[ ] BranchCache for Network Files FS-BranchCache Available
[ ] Data Deduplication FS-Data-Deduplication Available
[ ] DFS Namespaces FS-DFS-Namespace Available
[ ] DFS Replication FS-DFS-Replication Available
[ ] File Server Resource Manager FS-Resource-Manager Available
[ ] File Server VSS Agent Service FS-VSS-Agent Available
[ ] iSCSI Target Server FS-iSCSITarget-Server Available
[ ] iSCSI Target Storage Provider (VDS and V... iSCSITarget-VSS-VDS Available
[ ] Server for NFS FS-NFS-Service Available
[ ] Work Folders FS-SyncShareService Available
[X] Storage Services Storage-Services Installed
[ ] Host Guardian Service HostGuardianServiceRole Available
[ ] Hyper-V Hyper-V Available
[ ] Print and Document Services Print-Services Available
[ ] Print Server Print-Server Available
[ ] LPD Service Print-LPD-Service Available
[ ] Remote Access RemoteAccess Available
[ ] DirectAccess and VPN (RAS) DirectAccess-VPN Available
[ ] Routing Routing Available
[ ] Web Application Proxy Web-Application-Proxy Available
[ ] Remote Desktop Services Remote-Desktop-Services Available
[ ] Remote Desktop Licensing RDS-Licensing Available
[ ] Volume Activation Services VolumeActivation Available
[ ] Web Server (IIS) Web-Server Available
[ ] Web Server Web-WebServer Available
[ ] Common HTTP Features Web-Common-Http Available
[ ] Default Document Web-Default-Doc Available
[ ] Directory Browsing Web-Dir-Browsing Available
[ ] HTTP Errors Web-Http-Errors Available
[ ] Static Content Web-Static-Content Available
[ ] HTTP Redirection Web-Http-Redirect Available
[ ] WebDAV Publishing Web-DAV-Publishing Available
[ ] Health and Diagnostics Web-Health Available
[ ] HTTP Logging Web-Http-Logging Available
[ ] Custom Logging Web-Custom-Logging Available
[ ] Logging Tools Web-Log-Libraries Available
[ ] ODBC Logging Web-ODBC-Logging Available
[ ] Request Monitor Web-Request-Monitor Available
[ ] Tracing Web-Http-Tracing Available
[ ] Performance Web-Performance Available
[ ] Static Content Compression Web-Stat-Compression Available
[ ] Dynamic Content Compression Web-Dyn-Compression Available
[ ] Security Web-Security Available
[ ] Request Filtering Web-Filtering Available
[ ] Basic Authentication Web-Basic-Auth Available
[ ] Centralized SSL Certificate Support Web-CertProvider Available
[ ] Client Certificate Mapping Authentic... Web-Client-Auth Available
[ ] Digest Authentication Web-Digest-Auth Available
[ ] IIS Client Certificate Mapping Authe... Web-Cert-Auth Available
[ ] IP and Domain Restrictions Web-IP-Security Available
[ ] URL Authorization Web-Url-Auth Available
[ ] Windows Authentication Web-Windows-Auth Available
[ ] Application Development Web-App-Dev Available
[ ] .NET Extensibility 3.5 Web-Net-Ext Available
[ ] .NET Extensibility 4.8 Web-Net-Ext45 Available
[ ] Application Initialization Web-AppInit Available
[ ] ASP Web-ASP Available
[ ] ASP.NET 3.5 Web-Asp-Net Available
[ ] ASP.NET 4.8 Web-Asp-Net45 Available
[ ] CGI Web-CGI Available
[ ] ISAPI Extensions Web-ISAPI-Ext Available
[ ] ISAPI Filters Web-ISAPI-Filter Available
[ ] Server Side Includes Web-Includes Available
[ ] WebSocket Protocol Web-WebSockets Available
[ ] FTP Server Web-Ftp-Server Available
[ ] FTP Service Web-Ftp-Service Available
[ ] FTP Extensibility Web-Ftp-Ext Available
[ ] Management Tools Web-Mgmt-Tools Available
[ ] IIS Management Console Web-Mgmt-Console Available
[ ] IIS 6 Management Compatibility Web-Mgmt-Compat Available
[ ] IIS 6 Metabase Compatibility Web-Metabase Available
[ ] IIS 6 Scripting Tools Web-Lgcy-Scripting Available
[ ] IIS 6 WMI Compatibility Web-WMI Available
[ ] IIS Management Scripts and Tools Web-Scripting-Tools Available
[ ] Management Service Web-Mgmt-Service Available
[ ] Windows Deployment Services WDS Available
[ ] Transport Server WDS-Transport Available
[ ] Windows Server Update Services UpdateServices Available
[ ] WID Connectivity UpdateServices-WidDB Available
[ ] WSUS Services UpdateServices-Services Available
[ ] SQL Server Connectivity UpdateServices-DB Available
[ ] .NET Framework 3.5 Features NET-Framework-Features Available
[ ] .NET Framework 3.5 (includes .NET 2.0 and 3.0) NET-Framework-Core Removed
[ ] HTTP Activation NET-HTTP-Activation Available
[ ] Non-HTTP Activation NET-Non-HTTP-Activ Available
[X] .NET Framework 4.8 Features NET-Framework-45-Fea... Installed
[X] .NET Framework 4.8 NET-Framework-45-Core Installed
[ ] ASP.NET 4.8 NET-Framework-45-ASPNET Available
[X] WCF Services NET-WCF-Services45 Installed
[ ] HTTP Activation NET-WCF-HTTP-Activat... Available
[ ] Message Queuing (MSMQ) Activation NET-WCF-MSMQ-Activat... Available
[ ] Named Pipe Activation NET-WCF-Pipe-Activat... Available
[ ] TCP Activation NET-WCF-TCP-Activati... Available
[X] TCP Port Sharing NET-WCF-TCP-PortShar... Installed
[ ] Background Intelligent Transfer Service (BITS) BITS Available
[ ] IIS Server Extension BITS-IIS-Ext Available
[ ] Compact Server BITS-Compact-Server Available
[ ] BitLocker Drive Encryption BitLocker Available
[ ] BranchCache BranchCache Available
[ ] Client for NFS NFS-Client Available
[ ] Containers Containers Available
[ ] Data Center Bridging Data-Center-Bridging Available
[ ] Enhanced Storage EnhancedStorage Available
[ ] Failover Clustering Failover-Clustering Available
[ ] Group Policy Management GPMC Available
[ ] Host Guardian Hyper-V Support HostGuardian Available
[ ] I/O Quality of Service DiskIo-QoS Available
[ ] IIS Hostable Web Core Web-WHC Available
[ ] IP Address Management (IPAM) Server IPAM Available
[ ] iSNS Server service ISNS Available
[ ] Management OData IIS Extension ManagementOdata Available
[ ] Media Foundation Server-Media-Foundation Available
[ ] Message Queuing MSMQ Available
[ ] Message Queuing Services MSMQ-Services Available
[ ] Message Queuing Server MSMQ-Server Available
[ ] Directory Service Integration MSMQ-Directory Available
[ ] HTTP Support MSMQ-HTTP-Support Available
[ ] Message Queuing Triggers MSMQ-Triggers Available
[ ] Routing Service MSMQ-Routing Available
[ ] Message Queuing DCOM Proxy MSMQ-DCOM Available
[ ] Multipath I/O Multipath-IO Available
[ ] Network Load Balancing NLB Available
[ ] Network Virtualization NetworkVirtualization Available
[ ] Peer Name Resolution Protocol PNRP Available
[ ] Quality Windows Audio Video Experience qWave Available
[ ] Remote Differential Compression RDC Available
[ ] Remote Server Administration Tools RSAT Available
[ ] Feature Administration Tools RSAT-Feature-Tools Available
[ ] BitLocker Drive Encryption Administratio... RSAT-Feature-Tools-B... Available
[ ] DataCenterBridging LLDP Tools RSAT-DataCenterBridg... Available
[ ] Failover Clustering Tools RSAT-Clustering Available
[ ] Failover Cluster Module for Windows ... RSAT-Clustering-Powe... Available
[ ] Failover Cluster Automation Server RSAT-Clustering-Auto... Available
[ ] Failover Cluster Command Interface RSAT-Clustering-CmdI... Available
[ ] IP Address Management (IPAM) Client IPAM-Client-Feature Available
[ ] Shielded VM Tools RSAT-Shielded-VM-Tools Available
[ ] Storage Migration Service Tools RSAT-SMS Available
[ ] Storage Replica Module for Windows Power... RSAT-Storage-Replica Available
[ ] System Insights Module for Windows Power... RSAT-System-Insights Available
[ ] Role Administration Tools RSAT-Role-Tools Available
[ ] AD DS and AD LDS Tools RSAT-AD-Tools Available
[ ] Active Directory module for Windows ... RSAT-AD-PowerShell Available
[ ] AD DS Tools RSAT-ADDS Available
[ ] Active Directory Administrative ... RSAT-AD-AdminCenter Available
[ ] AD DS Snap-Ins and Command-Line ... RSAT-ADDS-Tools Available
[ ] AD LDS Snap-Ins and Command-Line Tools RSAT-ADLDS Available
[ ] Hyper-V Management Tools RSAT-Hyper-V-Tools Available
[ ] Hyper-V Module for Windows PowerShell Hyper-V-PowerShell Available
[ ] Windows Server Update Services Tools UpdateServices-RSAT Available
[ ] API and PowerShell cmdlets UpdateServices-API Available
[ ] DHCP Server Tools RSAT-DHCP Available
[ ] DNS Server Tools RSAT-DNS-Server Available
[ ] Remote Access Management Tools RSAT-RemoteAccess Available
[ ] Remote Access module for Windows Pow... RSAT-RemoteAccess-Po... Available
[ ] RPC over HTTP Proxy RPC-over-HTTP-Proxy Available
[ ] Setup and Boot Event Collection Setup-and-Boot-Event... Available
[ ] Simple TCP/IP Services Simple-TCPIP Available
[ ] SMB 1.0/CIFS File Sharing Support FS-SMB1 Available
[ ] SMB 1.0/CIFS Client FS-SMB1-CLIENT Available
[ ] SMB 1.0/CIFS Server FS-SMB1-SERVER Available
[ ] SMB Bandwidth Limit FS-SMBBW Available
[ ] SNMP Service SNMP-Service Available
[ ] SNMP WMI Provider SNMP-WMI-Provider Available
[ ] Storage Migration Service SMS Available
[ ] Storage Migration Service Proxy SMS-Proxy Available
[ ] Storage Replica Storage-Replica Available
[X] System Data Archiver System-DataArchiver Installed
[ ] System Insights System-Insights Available
[ ] Telnet Client Telnet-Client Available
[ ] VM Shielding Tools for Fabric Management FabricShieldedTools Available
[X] Windows Defender Antivirus Windows-Defender Installed
[ ] Windows Internal Database Windows-Internal-Dat... Available
[X] Windows PowerShell PowerShellRoot Installed
[X] Windows PowerShell 5.1 PowerShell Installed
[ ] Windows PowerShell 2.0 Engine PowerShell-V2 Removed
[ ] Windows PowerShell Desired State Configurati... DSC-Service Available
[ ] Windows PowerShell Web Access WindowsPowerShellWeb... Available
[ ] Windows Process Activation Service WAS Available
[ ] Process Model WAS-Process-Model Available
[ ] .NET Environment 3.5 WAS-NET-Environment Available
[ ] Configuration APIs WAS-Config-APIs Available
[ ] Windows Server Backup Windows-Server-Backup Available
[ ] Windows Server Migration Tools Migration Available
[ ] Windows Standards-Based Storage Management WindowsStorageManage... Available
[ ] Windows Subsystem for Linux Microsoft-Windows-Su... Available
[ ] WinRM IIS Extension WinRM-IIS-Ext Available
[ ] WINS Server WINS Available
[X] WoW64 Support WoW64-Support Installed
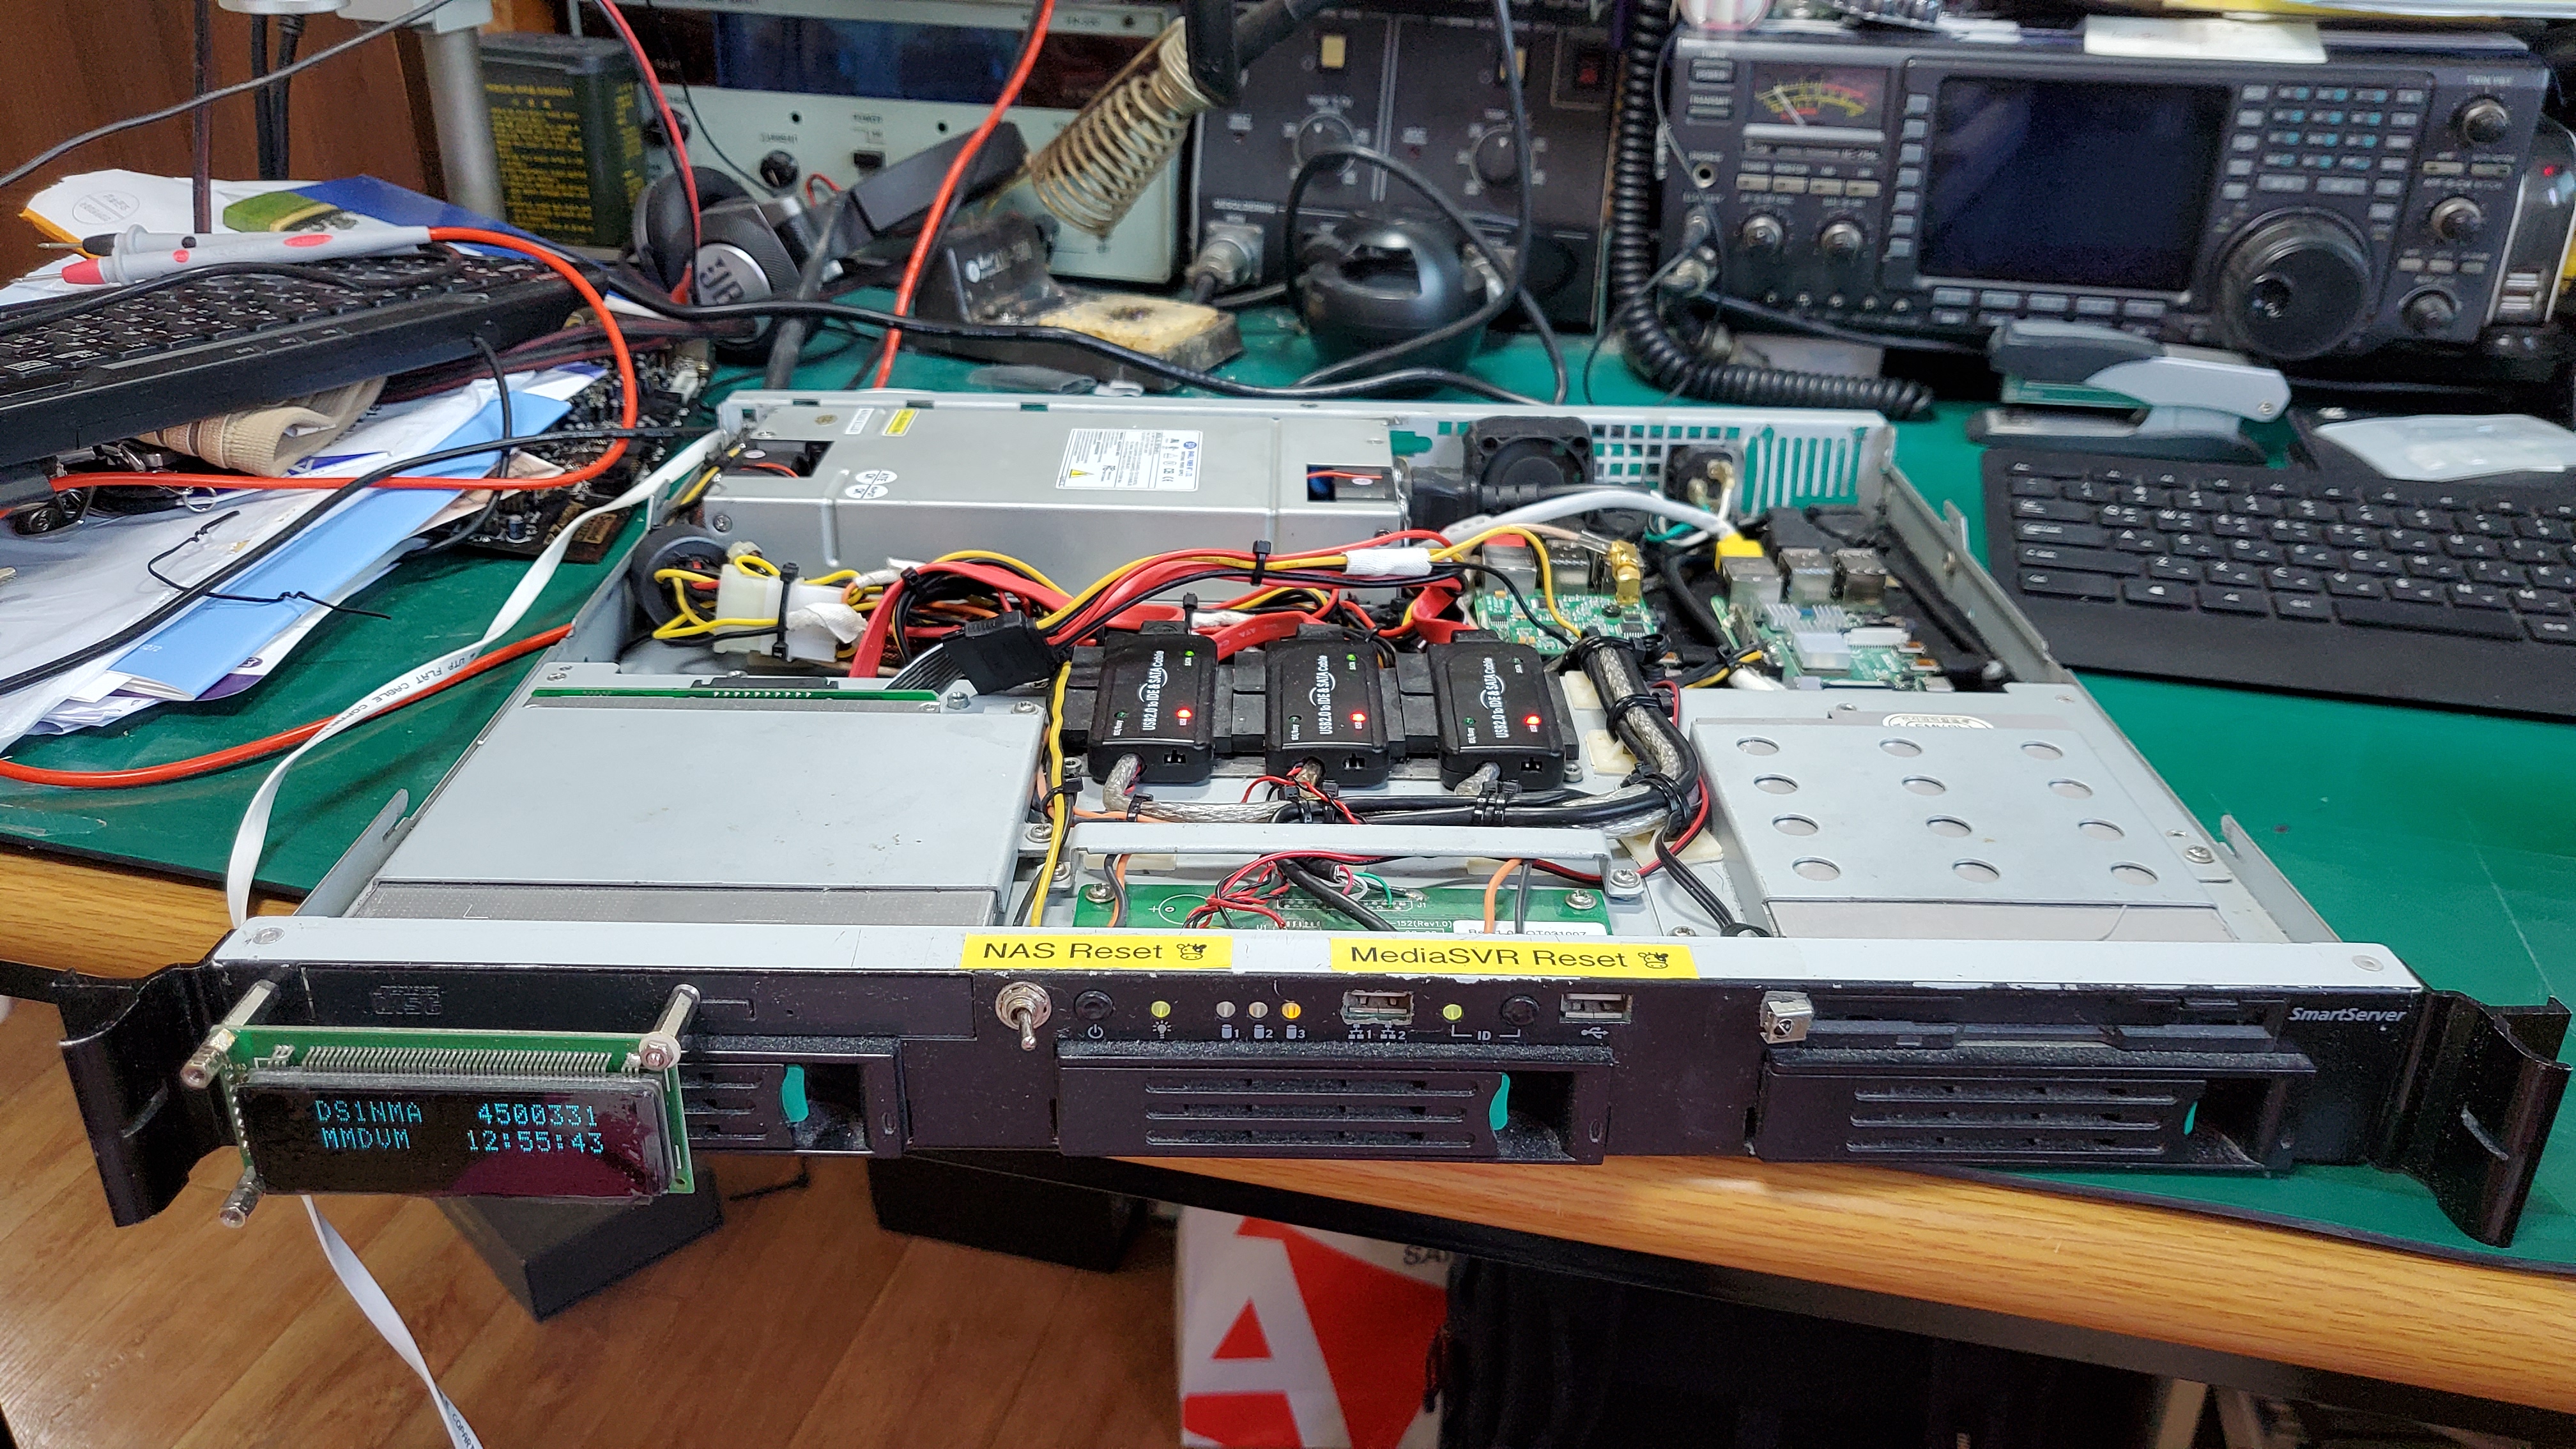
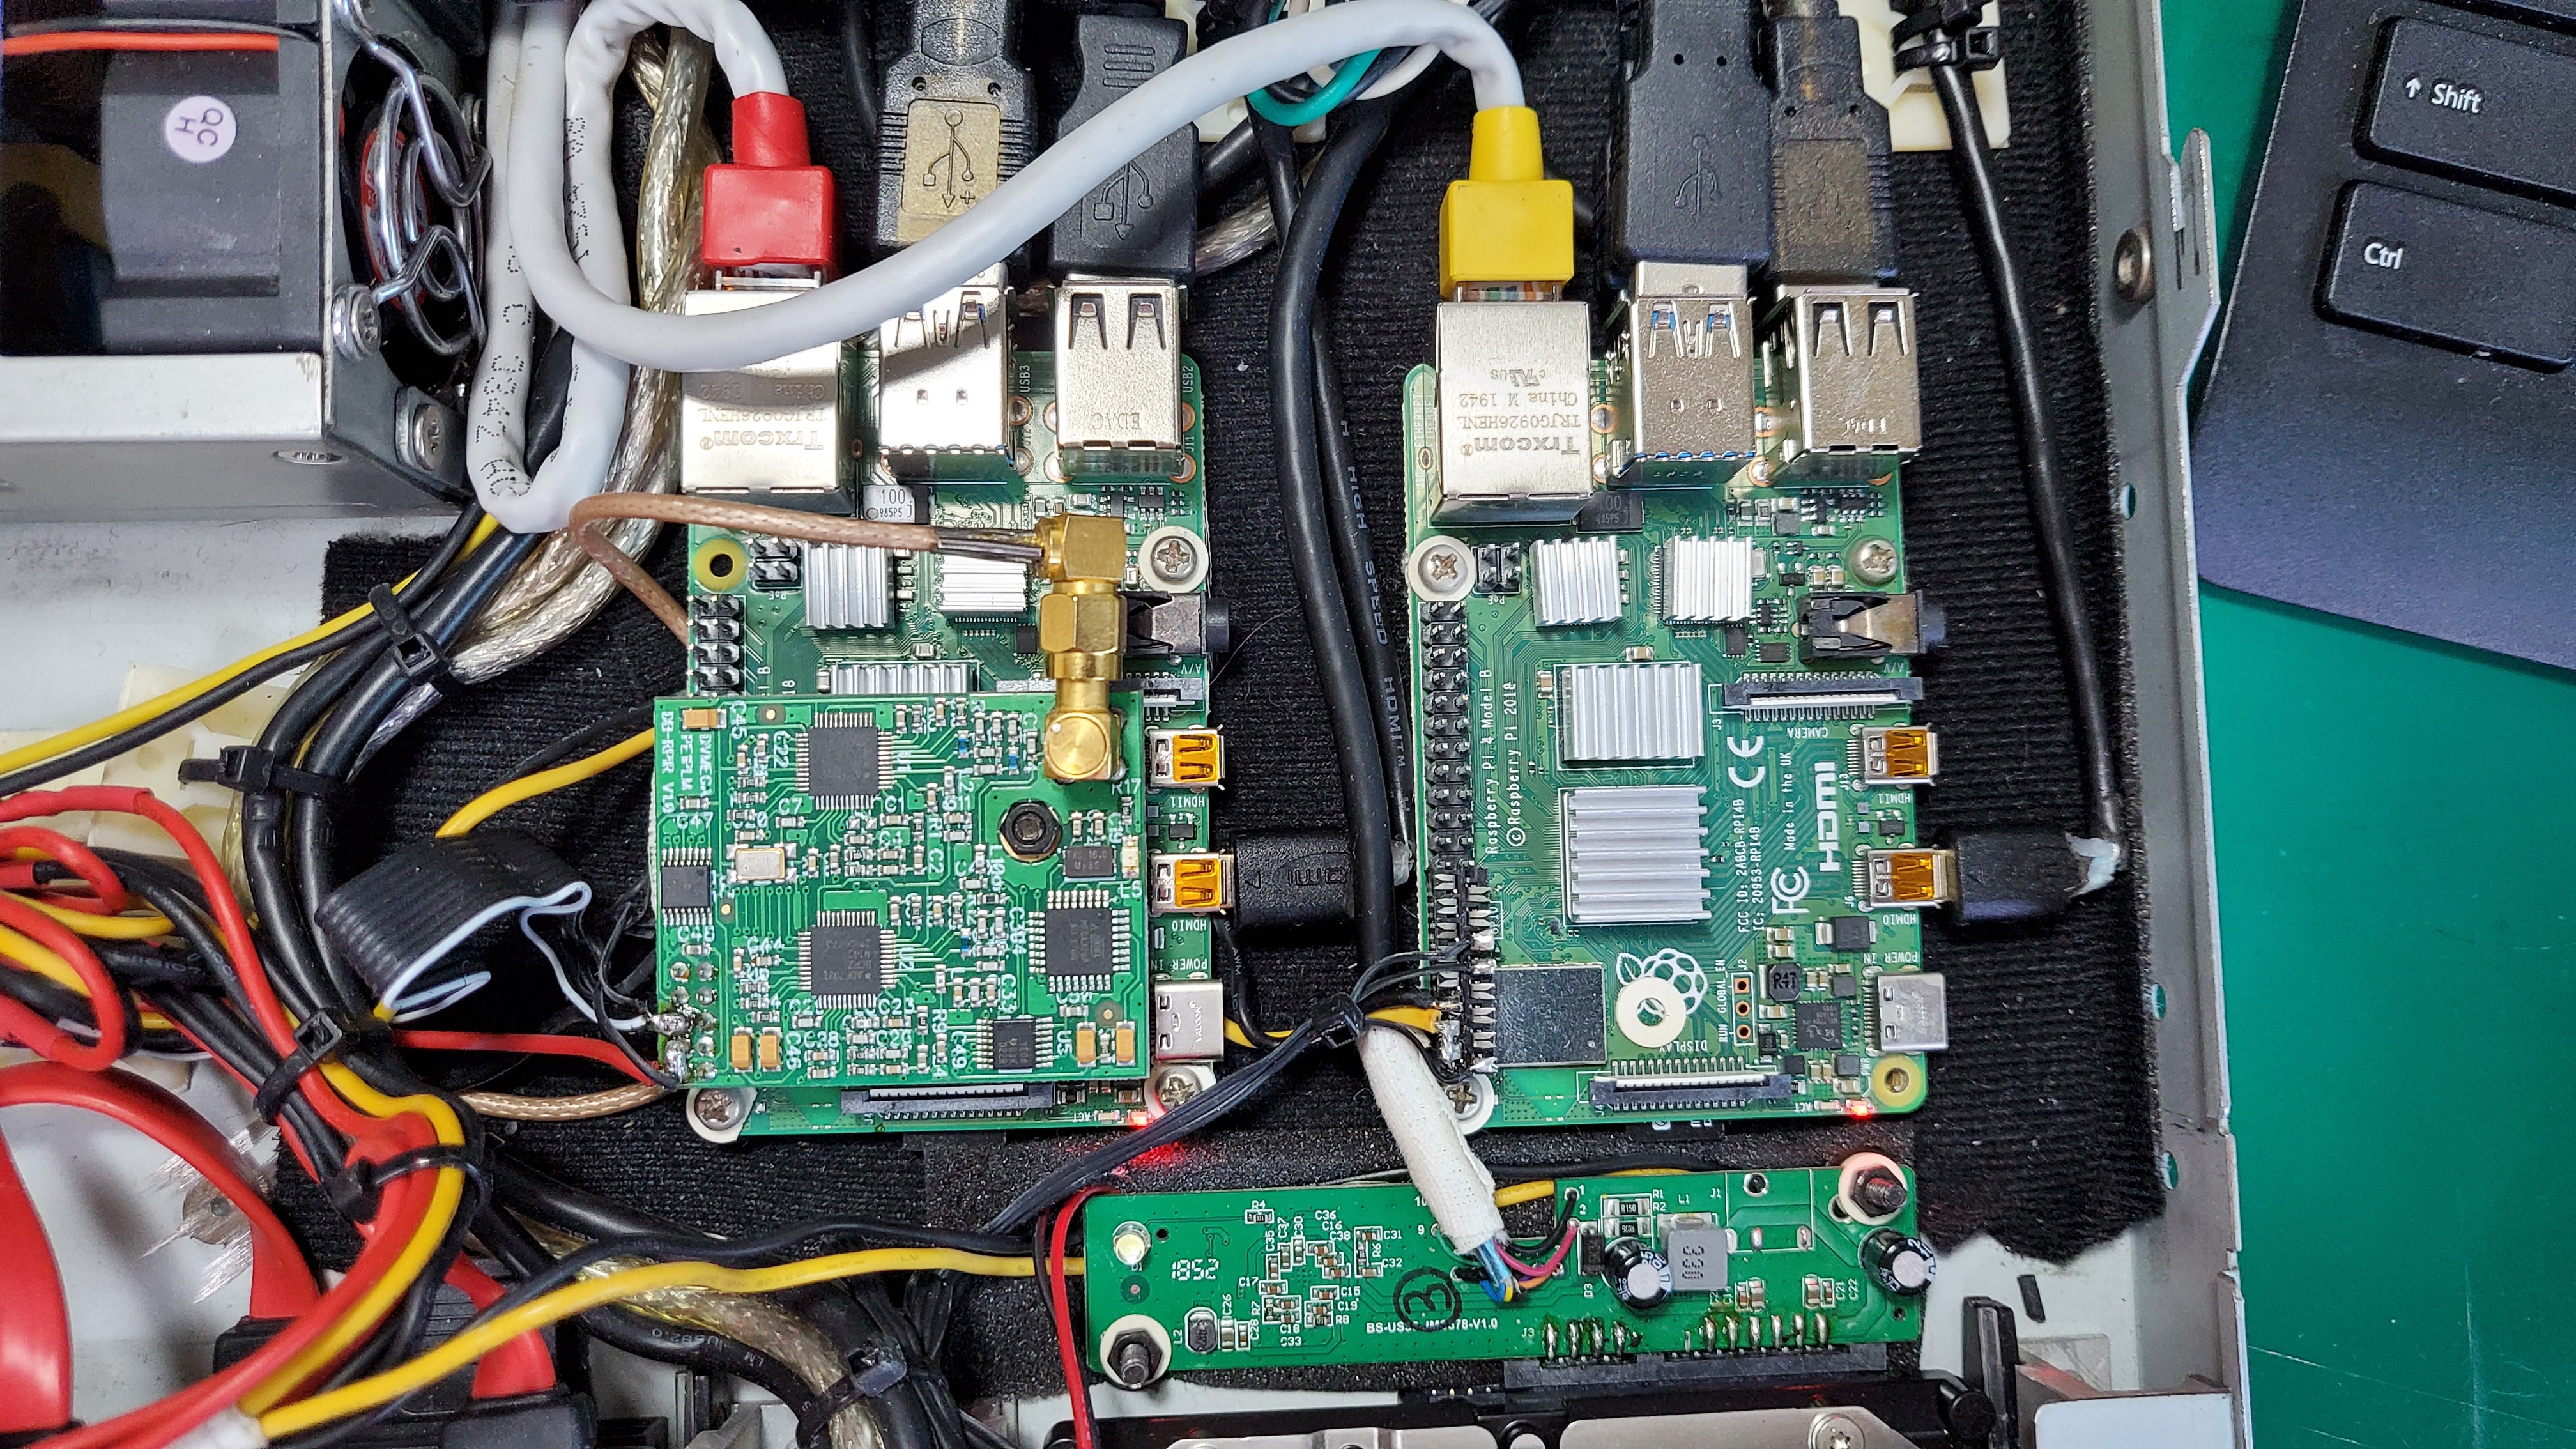
PS C:\Users\Administrator>MMDVMHost/ircddbGateway Install on Raspberry Pi 4
집에 설치된 라즈베리파이 서버가 SD카드로 OS 파티션을 구성하니 시간이 지나면 갑자기 메모리가 손상되는 일이 자주 있다. 1년에 4~5번꼴로 삭제와 포맷, 재설치가 반복이 되기 때문에 현재 라즈베리파이 서버에 D-STAR Hotspot 기능과 IP-PBX, Web server, NAS Storage Server가 구동되고 있어 이런 많은 구성을 두는 나로선 상당히 피곤하다.
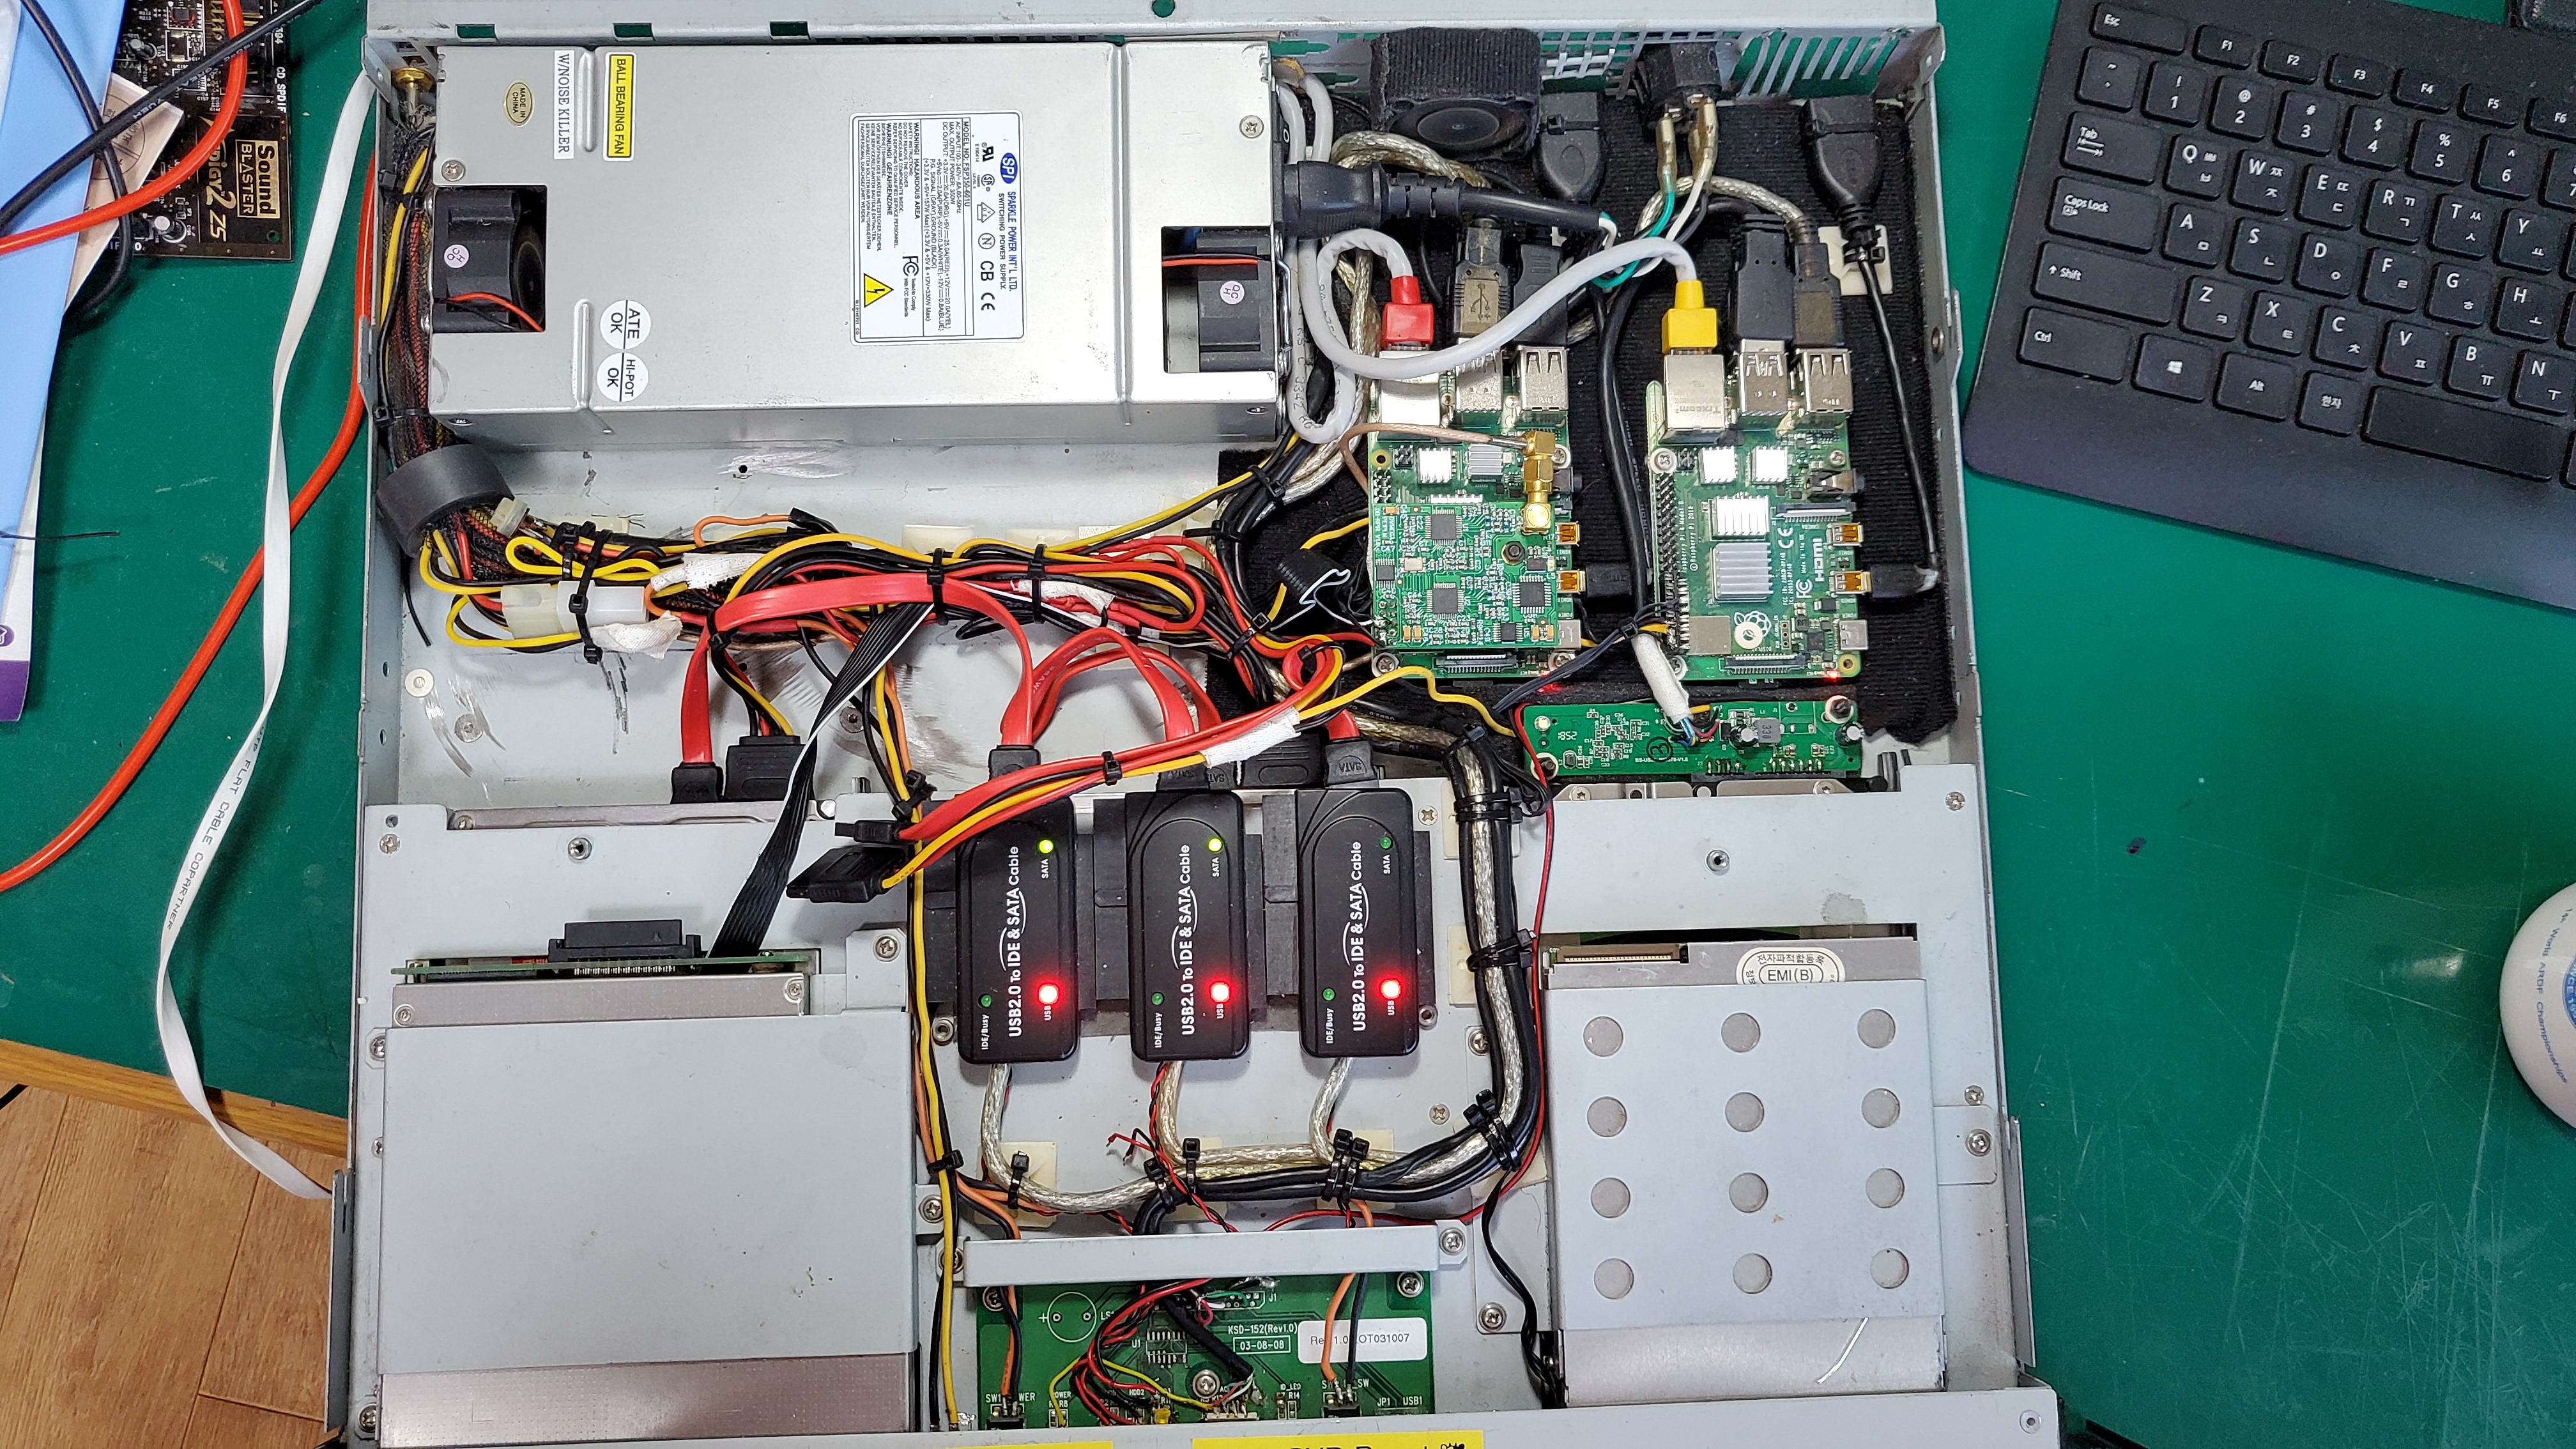
라즈베리파이4 에서는 bootloader 차원에서 USB부팅이 가능하여 앞으로는 OS를 SD카드를 사용하지 않고 USB로 연결된 안정적인 1TB HDD를 사용하기로 하여 새로 구성을 하면서 설치과정을 정리해 보았다.
Destinate : Raspberry Pi 4 4GB + DVMega Board , after installed complete Asterisk 16 and FreePBX 15
● Initialize
# systemctl stop serial-getty@ttyAMA0.service
# systemctl disable serial-getty@ttyAMA0.service
# nano /boot/cmdline.txt
‘console=serial0,115200’ 삭제
# nano /boot/config.txt
dtoverlay=disable-bt 추가
● Install MMDVMHost with compile
# apt-get install git screen
# cd /tmp → if you use HD44780
# w get https://project-downloads.drogon.net/wiringpi-latest.deb → if you use HD44780
# sudo dpkg -i wiringpi-latest.deb → if you use HD44780
(Raspberry Pi4 기종이 apt repository의 WiringPi에서는 지원하지 않아 최신버전 2.52 패키지로 설치해야 HD44780 출력이 동작함, http://wiringpi.com/wiringpi-updated-to-2-52-for-the-raspberry-pi-4b/)
# cd /opt
# git clone https://github.com/g4klx/MMDVMHost.git
# git clone https://github.com/g4klx/MMDVMCal.git
# cd /opt/MMDVMHost
# make → if you use HD44780, don't use make
# make -f Makefile.Pi.HD44780 → if you use HD44780, execuate this command.
# nano MMDVM.ini
|
[General] Callsign=DS1NMA Id=450371 #Timeout=180 Duplex=1 # ModeHang=10 RFModeHang=10 NetModeHang=3 Display=HD44780 Daemon=0
[Info] RXFrequency=432380000 TXFrequency=437380000 Power=1 Latitude=0.0 Longitude=0.0 Height=0 Location=Seoul, Korea Description=DS1NMA Repeater URL=rep.kkit.kr
[Log] # Logging levels, 0=No logging DisplayLevel=1 FileLevel=2 FilePath=/var/log/MMDVM FileRoot=MMDVM
[CW Id] Enable=1 Time=10 # Callsign=
[DMR Id Lookup] File=/opt/MMDVMHost/DMRIds.dat Time=24
[NXDN Id Lookup] File=NXDN.csv Time=24
[Modem] # Port=/dev/ttyACM0 Port=/dev/ttyAMA0 #Port=\\.\COM3 # Protocol=uart # Address=0x22 TXInvert=1 RXInvert=0 PTTInvert=0 TXDelay=100 RXOffset=0 TXOffset=0 DMRDelay=0 RXLevel=50 TXLevel=50 RXDCOffset=0 TXDCOffset=0 RFLevel=100 # CWIdTXLevel=50 # D-StarTXLevel=50 # DMRTXLevel=50 # YSFTXLevel=50 # P25TXLevel=50 # NXDNTXLevel=50 # POCSAGTXLevel=50 # RSSIMappingFile=RSSI.dat Trace=0 Debug=0
[Transparent Data] Enable=0 RemoteAddress=127.0.0.1 RemotePort=40094 LocalPort=40095 # SendFrameType=0
[UMP] Enable=0 # Port=\\.\COM4 Port=/dev/ttyACM1
[D-Star] Enable=1 Module=B SelfOnly=0 AckReply=1 AckTime=750 AckMessage=0 ErrorReply=1 RemoteGateway=0 # ModeHang=10
[DMR] Enable=0 Beacons=0 BeaconInterval=60 BeaconDuration=3 ColorCode=1 SelfOnly=0 EmbeddedLCOnly=0 DumpTAData=1 # Prefixes=234,235 # Slot1TGWhiteList= # Slot2TGWhiteList= CallHang=3 TXHang=4 # ModeHang=10
[System Fusion] Enable=0 LowDeviation=0 SelfOnly=0 TXHang=4 #DGID=1 RemoteGateway=0 # ModeHang=10
[P25] Enable=0 NAC=293 SelfOnly=0 OverrideUIDCheck=0 RemoteGateway=0 # ModeHang=10
[NXDN] Enable=0 RAN=1 SelfOnly=0 RemoteGateway=0 # ModeHang=10
[POCSAG] Enable=0 Frequency=439987500
[D-Star Network] Enable=1 GatewayAddress=127.0.0.1 GatewayPort=20010 LocalPort=20011 # ModeHang=3 Debug=0
[DMR Network] Enable=0 Address=44.131.4.1 Port=62031 Jitter=360 # Local=62032 Password=PASSWORD # Options= Slot1=1 Slot2=1 # ModeHang=3 Debug=0
[System Fusion Network] Enable=0 LocalAddress=127.0.0.1 LocalPort=3200 GatewayAddress=127.0.0.1 GatewayPort=4200 # ModeHang=3 Debug=0
[P25 Network] Enable=0 GatewayAddress=127.0.0.1 GatewayPort=42020 LocalPort=32010 # ModeHang=3 Debug=0
[NXDN Network] Enable=0 LocalAddress=127.0.0.1 LocalPort=14021 GatewayAddress=127.0.0.1 GatewayPort=14020 # ModeHang=3 Debug=0
[POCSAG Network] Enable=0 LocalAddress=127.0.0.1 LocalPort=3800 GatewayAddress=127.0.0.1 GatewayPort=4800 # ModeHang=3 Debug=0
[TFT Serial] # Port=modem Port=/dev/ttyAMA0 Brightness=50
[HD44780] Rows=2 Columns=16
# For basic HD44780 displays (4-bit connection) # rs, strb, d0, d1, d2, d3 Pins=11,10,0,1,2,3
# Device address for I2C I2CAddress=0x20
# PWM backlight PWM=0 PWMPin=21 PWMBright=100 PWMDim=16
DisplayClock=1 UTC=1
[Nextion] # Port=modem Port=/dev/ttyAMA0 Brightness=50 DisplayClock=1 UTC=0 #Screen Layout: 0=G4KLX 2=ON7LDS ScreenLayout=2 IdleBrightness=20
[OLED] Type=3 Brightness=0 Invert=0 Scroll=1 Rotate=0 Cast=0
[LCDproc] Address=localhost Port=13666 #LocalPort=13667 DimOnIdle=0 DisplayClock=1 UTC=0
[Lock File] Enable=0 File=/tmp/MMDVM_Active.lck
[Mobile GPS] Enable=0 Address=127.0.0.1 Port=7834
[Remote Control] Enable=0 Port=7642
|
# cd /opt/MMDVMCal
# make
# nano /lib/systemd/system/mmdvmhost.service
|
[Unit] Description=MMDVM Host Service After=syslog.target network.target
[Service] User=root WorkingDirectory=/opt/MMDVMHost ExecStart=/usr/bin/screen -S MMDVMHost -D -m /opt/MMDVMHost/MMDVMHost /opt/MMDVMHost/MMDVM.ini ExecStop=/usr/bin/screen -S MMDVMHost -X quit
[Install] WantedBy=multi-user.target
|
# chmod 755 /lib/systemd/system/mmdvmhost.service
# ln -s /lib/systemd/system/mmdvmhost.service /etc/systemd/system/mmdvmhost.service
# nano /lib/systemd/system/mmdvmhost.timer
|
[Timer] [Install] WantedBy=multi-user.target
|
# chmod 755 /lib/systemd/system/mmdvmhost.timer
# ln -s /lib/systemd/system/mmdvmhost.timer /etc/systemd/system/mmdvmhost.timer
# systemctl daemon-reload
# systemctl enable mmdvmhost.timer
# reboot
● Install ircDDBGateway (get github repository and compile)
# apt-get install libwxgtk3.0-dev git build-essential
# cd ~
# git clone --depth 1 https://github.com/g4klx/ircDDBGateway.git
# cd ~/ircDDBGateway
# make
# make install
데몬은 /usr/bin/ircddbgatewayd
설정파일은 nano /etc/ircddbgateway
|
language=6 description2=Korea ircddbEnabled=1 ircddbHostname=rr.openquad.net ircddbUsername=ds1nma ircddbPassword= aprsEnabled=1 aprsHostname=rotate.aprs2.net aprsPort=14580 ccsEnabled=1 ccsHost=CCS704 dextraEnabled=1 dextraMaxDongles=3 dplusEnabled=1 dplusMaxDongles=3 dplusLogin=DS1NMA dcsEnabled=1 remoteEnabled=1 remotePassword=1 remotePort=10022 infoEnabled=1 echoEnabled=1 logEnabled=0 dratsEnabled=1 dtmfEnabled=1 repeaterBand1=B repeaterType1=0 repeaterAddress1=127.0.0.1 repeaterPort1=20011 frequency1=437.38 offset1=0.0000 rangeKms1=0.0000 agl1=0.000 reflector1=XRF076 B atStartup1=1 reconnect1=0 latitude1=0.000000 longitude1=0.000000 |
데이터폴더는 /usr/share/ircddbgateway
로그는 /var/log/ircddbgateway
# nano /lib/systemd/system/ircddbgatewayd.service
|
[Unit] Description=D-STAR Gateway Daemon After=network.target
[Service] User=root ExecStart=/usr/bin/ircddbgatewayd Restart=on-abort
[Install] WantedBy=multi-user.target |
# systemctl daemon-reload
# systemctl start ircddbgatewayd
# systemctl status ircddbgatewayd
Install Asterisk 16 and FreePBX 15 on Raspberry PI 4
데비안 기준이라 수정할게 좀 있음. 확인하면서 적용하기 바람.
Step-by-step guide
All commands are to be run as the root user, either by directly logging in as root or by using sudo su - .
Start from a base Debian 10 installation. All necessary packages will be installed through the following commands.
Prerequisite recommended OS update
Add the backports repo specifically so that the odbc-mariadb package is available. Then update the OS to current.
- 사전에 타이프 할것
- apt-key adv --keyserver keyserver.ubuntu.com --recv-keys 04EE7237B7D453EC
- apt-key adv --keyserver keyserver.ubuntu.com --recv-keys 648ACFD622F3D138
- echo deb http://ftp.us.debian.org/debian/ buster-backports main > /etc/apt/sources.list.d/backports.list
- echo deb-src http://ftp.us.debian.org/debian/ buster-backports main >> /etc/apt/sources.list.d/backports.list
- apt-get update
- apt-get upgrade
Install all the necessary packages (취소선 그어진 것은 raspbian 10에서 설치 안됨. 삭제하고 실행
- apt-get install -y build-essential linux-headers-*
`uname -r`openssh-server apache2 mariadb-server mariadb-client bison flex php php-curl php-cliphp-pdophp-mysql php-pear php-gd php-mbstring php-intl php-bcmath curl sox libncurses5-dev libssl-dev mpg123 libxml2-dev libnewt-dev sqlite3 libsqlite3-dev pkg-config automake libtool autoconf git unixodbc-dev uuid uuid-dev libasound2-dev libogg-dev libvorbis-dev libicu-dev libcurl4-openssl-dev libical-dev libneon27-dev libsrtp2-dev libspandsp-dev sudo subversion libtool-bin python-dev unixodbc dirmngr sendmail-bin sendmail asterisk debhelper-compat cmake libmariadb-devodbc-mariadbphp-ldap
Install Node.js (setup_11.x --> setup_12.x 로 바꿀것)
- curl -sL https://deb.nodesource.com/
setup_11.xsetup_12.x | sudo -E bash - - apt-get install -y nodejs
Install this required Pear module
- pear install Console_Getopt
Prepare Asterisk
- systemctl stop asterisk
- systemctl disable asterisk
- cd /etc/asterisk
- mkdir DIST
- mv * DIST
- cp DIST/asterisk.conf .
- sed -i 's/(!)//' asterisk.conf
- touch modules.conf
- touch cdr.conf
Configure Apache web server
- sed -i 's/\(^upload_max_filesize = \).*/\120M/' /etc/php/7.3/apache2/php.ini
- sed -i 's/\(^memory_limit = \).*/\1256M/' /etc/php/7.3/apache2/php.ini
- sed -i 's/^\(User\|Group\).*/\1 asterisk/' /etc/apache2/apache2.conf
- sed -i 's/AllowOverride None/AllowOverride All/' /etc/apache2/apache2.conf
- a2enmod rewrite
- service apache2 restart
- rm /var/www/html/index.html
Configure ODBC
- cat <<EOF > /etc/odbcinst.ini
[MySQL]
Description = ODBC for MySQL (MariaDB)
Driver = /usr/lib/x86_64-linux-gnu/odbc/libmaodbc.so
FileUsage = 1
EOF - cat <<EOF > /etc/odbc.ini
[MySQL-asteriskcdrdb]
Description = MySQL connection to ‘asteriskcdrdb’ database
Driver = MySQL
Server = localhost
Database = asteriskcdrdb
Port = 3306
Socket = /var/run/mysqld/mysqld.sock
Option = 3
EOF
Download FFMPEG static build for sound file manipulation
- cd /usr/local/src
- wget "https://johnvansickle.com/ffmpeg/releases/ffmpeg-release-amd64-static.tar.xz"
- tar xf ffmpeg-release-amd64-static.tar.xz
- cd ffmpeg-4*
- mv ffmpeg /usr/local/bin
Install FreePBX
- cd /usr/local/src
- wget http://mirror.freepbx.org/modules/packages/freepbx/freepbx-15.0-latest.tgz
- tar zxvf freepbx-15.0-latest.tgz
- cd /usr/local/src/freepbx/
- ./start_asterisk start
- ./install -n
Get the rest of the modules
Only a very basic system is installed at this point. You will probably want to install all the modules on Debian 10 . Alternatively, you can skip this and pick-and-choose the individual modules you want later.
- fwconsole ma installall
Uninstall digium_phones
Broken with PHP 7.3 (April 2020).
- fwconsole ma uninstall digium_phones
Apply the current configuration
- fwconsole reload
Set symlinks to the correct sound files
- cd /usr/share/asterisk
- mv sounds sounds-DIST
- ln -s /var/lib/asterisk/sounds sounds
Perform a restart to load all Asterisk modules that had not yet been configured
- fwconsole restart
Set up systemd (startup script)
- cat <<EOF > /etc/systemd/system/freepbx.service
[Unit]
Description=FreePBX VoIP Server
After=mariadb.service
[Service]
Type=oneshot
RemainAfterExit=yes
ExecStart=/usr/sbin/fwconsole start -q
ExecStop=/usr/sbin/fwconsole stop -q
[Install]
WantedBy=multi-user.target
EOF - systemctl daemon-reload
- systemctl enable freepbx
Asterisk and FreePBX 15 are installed on Debian 10 ! Go to the web interface at http://YOUR-IP to finish setup
Modified of Pi-Star OS (D-STAR Pi-Star OS의 수정)
몇 달 전, Hotspot 및 Service Server로 사용하던 Raspberry PI 3의 OS가 포함된 SD카드가 박살나는 사태가 벌어졌다.
Raspbian streach 기반에다가 MMDVMHost, ircddbgateway를 어렵게 설치하고 apache2, php7.1, apache tomcat 8.5, samba 등 여러 서비스를 잘 돌리고 있었는데 결국은 그렇게 되었고 이 참에 H/W도 Raspberry Pi 4 4GB 모델로 교체 및 새로운 메모리에 OS를 올리고 다시 수동으로 설치하려 하였으나 MMDVMHost와 IRCDDBGateway, DstarRepeater 등 D-Star HotSpot에 필요한 S/W의 repository가 모두 죽어서 apt-get이나 deb 패키지로 설치할 수 없어졌다.
모 D-STAR 유저그룹 카페에 문의를 하였으나, 어떤 분이 어려운길을 갈려고 한다고 비아냥(?) 비슷한 댓글을 달아놓으시면서 본인이 가르쳐 주겠다고 메일주소를 보내라 하셔서 답신을 드렸으나 6개월째 깜깜 무소식이라는.....
(이상하게 뭐좀 잘 안다는 아마추어무선사는 .. 공유정신이 부족하다는 생각이 듬...)
Pi-Star는 내가 휴대용으로 쓰는 HotSpot의 전용OS로는 이미 쓰고 있었는데, 이건 본래 기능 외에 Samba, apache2 등 다른 기능은 일절 세팅이 어렵게 만들어져서 솔직히 내 입맛에는 맞지 않았었으나..
마침 심근경색 치료 및 퇴원 후 요양중 시간이 좀 남아서 PI-Star OS를 역으로 풀어내는 방법을 찾아보았고, 제작자인 MW0Andy Taylor (MW0MWZ)가 여기저기 modify를 하면서 lock 걸어놓은 것들을 하나하나 찾아 unlock 하고 그가 modify하면서 잘못 install된 부분도 debian repository standard로 교체하면서 내 입맛에 맞도록 사용하게 다시 Modify하게 되었다.
참고로 Pi-Star를 500MHz 짜리의 Raspberry Pi Zero(ZumSpot과 쌍을 이루기 위한)에서 돌릴 때보다는 Raspberry PI 4 4GB 버전이 dashboard 및 setting change 후 refresh 하는 속도가 엄청 빠르다. (거의 바로바로, 서비스 재기동이 빨라서)
나는 raspberry pi 4를 raspbian base에 도메인과 DDNS를 이용한 연결이 필요하기 때문에 고정IP 세팅을 해야 하며, 속도로 인해 WiFi connection이 전혀 필요치 않고 Wired network이 필요하다. 또한 Samba를 이용한 NAS, apache2 및 php7.3으로의 웹서버, Pydio Disk server, postfix 및 roundcube를 사용한 Mail Server가 반드시 필요하다.
아래는 pi-star 4.1 버전 이상(buster based)에서 작업한 사항이다.
1. Image write to SD Card
2. Log-in pi-star account on SSH
3. sudo su - root
4. rpi-rw
[Static IP on eth0 - internal wired network]
/etc/dhcpcd.conf
insert this value
interface eth0
static ip_address=10.10.86.10/24
static routers=10.10.86.254
static domain_name_servers=10.10.86.254 8.8.8.8 8.8.4.4
[read only and temp partition disable]
1. sudo su - root
2. rpi-rw
3. nano /etc/fstab
4. /dev/mmcblk0p1 and /dev/mmcblk0p2 change option "ro" to "rw"
5. insert remark all mounted value "tmpfs".
6. save and reboot
[RAID Install]
1. sudo su - root
2. rpi-rw
3. apt-get update
4. apt-get install mdadm
5. mdadm --create --verbose /dev/md0 --level=0 --raid-devices=2 /dev/sda /dev/sdb - create raid partition.
6. mkdir /media/exDrive1
7. mount /dev/md0 /media/exDrive1
8. blkid - check UUID of created and mounted raid volume
9. insert UUID and mount directory to /etc/fstab
ex) UUID="c593a5ec-c103-414a-b93b-e154527420b3" /media/exDrive1 ext4 defaults,noatime,rw 0 0
10. reboot
[root enable]
1. sudo su - root
2. rpi-rw
3. passwd root --> input password
4. /etc/ssh/sshd.conf --> permitrootlogin NO to YES
[Samba install]
Must erase and purge installed samba service.
1. sudo su - root
2. rpi-rw
3. apt-get update
4. apt-get purge samba samba-common smbclient
5. rm -rf /etc/samba
6. apt-get upgrade
7. apt-get install samba samba-common smbclient
8. change /etc/samba/smb.conf
insert this value
[global]
wins support = yes
[NASData]
path=/media/exDrive1/NASData
browseable=Yes
writeable=Yes
only guest=no
guest ok = no
create mask=0777
directory mask=0777
public=no
and another share directory disable.
9. systemctl restart smbd
[port change default Nginx webserver - pi-star dashboard]
change value /etc/nginx/sites-enabled/pi-star
1. root login
2. nano /etc/nginx/sites-enabled/pi-star
server {
listen 80 default_server; --> listen 8080 default_server;
3. nano /etc/nginx/sites-enabled/capidate-portal
server {
listen 80; --> listen 8080;
4. change port number you want
5. systemctl restart nginx
6. check connect modified port.
[Expand root partition]
※ pi-star is made only 2GB of root partition size. As default, You can't expand root partition.
If the root partition free space is shortage, You can't install any program. apt-get can't install it.
1. root login
2. check the space. (more space 3MB)
3. apt-get update
4. apt-get install raspi-config
5. raspi-config
6. ask account, please input pi-star. It's not pi.
7. select "7. Advanced Option"
8. select "A1.Expand Filesystem"
9. quit raspi-config
10. reboot
11. after reboot, type "df -h". You will be look expanded root patition.
[install apache2]
1. root login
2. apt-get install apache2
3. ps -ef | grep apache2
root@ds1nma-dstar(rw):~# ps -ef | grep apache2
root 4772 1 0 20:35 ? 00:00:00 /usr/sbin/apache2 -k start
www-data 4773 4772 0 20:35 ? 00:00:00 /usr/sbin/apache2 -k start
www-data 4774 4772 0 20:35 ? 00:00:00 /usr/sbin/apache2 -k start
root 5036 3654 0 20:36 pts/0 00:00:00 grep --color=auto apache2
4. It's ok.
[upgrade php7.0 to php7.3]
* pi-star is already installed php7.0. But I need php 7.3
1. root login
2. apt-get purge php*
3. apt-get update && apt-get upgrade
4. apt-get install php php-common
5. apt-get install php-cli php-fpm php-json php-mysql php-zip php-gd php-mbstring php-curl php-xml php-pear php-bcmath
6. nano /etc/nginx/default.d/php.conf
fastcgi_pass unix:/var/run/php/php7.0-fpm.sock --> php7.3-fpm.sock
7. apt -y install libapache2-mod-php
8. a2enmod php7.3
9. systemctl restart apache2
[Install MariaDB]
1. root login
2. apt -y install mariadb-server mariadb-client
[change account and password of pi-star dashboard]
1. /var/www/.htpasswd - account id : password
2. password change only dashboard. encoded.
3. show id on dashboard - configure.php
<form id="adminPassForm" action="<?php echo htmlspecialchars($_SERVER["PHP_SELF"]); ?>" method="post">
<table>
<tr><th width="200"><?php echo $lang['user'];?></th><th colspan="3"><?php echo $lang['password'];?></th></tr>
<tr>
<td align="left"><b>naraymm</b></td>
<td align="left"><label for="pass1">Password:</label><input type="password" name="adminPassword" id="pass1" onkeyup="checkPass(); return false;" size="20" />
<label for="pass2">Confirm Password:</label><input type="password" name="adminPassword" id="pass2" onkeyup="checkPass(); return false;" />
<br /><span id="confirmMessage" class="confirmMessage"></span></td>
<td align="right"><input type="button" id="submitpwd" value="<?php echo $lang['set_password'];?>" onclick="submitPassform()" disabled="disabled" /></td>
</tr>
<tr><td colspan="3"><b>WARNING:</b> This changes the password for this admin page<br />AND the "pi-star" SSH account</td></tr>
</table>
</form>
[MMDVM recompile for solve HD44780 LCD not show]
* pi-star에 포함된 MMDVMHost를 사용해서는 HD44780 LCD가 동작하지 않는다. 새로 컴파일 하고 실행파일을 교체해야 한다.
replaced the MMDVMHost file wit a new one made like this.
1. cd ~
2. git clone https://github.com/g4klx/MMDVMHost.git
3. cd MMDVMHost
4. make clean
5. make -f Makefile.Pi.HD44780
6. rm /usr/local/bin/MMDVMHost
7. cp ./MMDVMHost /usr/local/bin/MMDVMHost (replace complied MMDVMHost)
8. reboot
